Android Basics
![]()
Table of Contents
Introduction to Android
- What is Android
- Why Understanding Android Matters
- Android Ecosystem Overview
- Key Android Concepts
- Android vs Other Mobile OS
- Getting Started Resources
Core Architecture
- Linux Kernel Foundation
- Hardware Abstraction Layer
- Android Runtime ART
- Native C/C++ Libraries
- Application Framework
- System Apps vs User Apps
- Zygote Process
- Binder IPC Mechanism
- Android System Services
- Over the Air Updates
Security Model
- Application Sandboxing
- UID Separation and Isolation
- SELinux Implementation
- Verified Boot Chain
- SafetyNet Attestation
- Play Protect
- Android Protected Confirmation
- TrustZone Technology
- Hardware Security Module
File System and Storage
- System Partitions Layout
- Data Directory Structure
- Internal Storage
- External Storage Mechanisms
- External Media Handling
- Cache Directories
- App-Specific Storage
- Scoped Storage Android 10+
- File Permissions
- SQLite Databases
- Shared Preferences
APK Structure
- APK File Format
- AndroidManifest.xml Deep Dive
- DEX Files and Bytecode
- Resources and Assets
- Native Libraries in APK
- META-INF Signing
- APK Decompilation
- Smali Code
Application Components
- Activities and Lifecycle
- Services Background Work
- Broadcast Receivers
- Content Providers
- Intents Explicit vs Implicit
- Intent Filters
- Deep Links
- Pending Intents
- Fragments
- ViewModels
- LiveData
- App Widgets
Permission System
- Permission Types Overview
- Normal vs Dangerous Permissions
- Runtime Permissions Model
- Custom Permissions
- Permission Groups
- Signature Permissions
- Permission Delegation
Android Debug Bridge
- ADB Installation and Setup
- Device Connection Methods
- File Operations Push Pull
- Package Management Commands
- Logcat and Debugging
- Shell Access and Commands
- Activity Manager Commands
- Dumpsys Usage
- ADB over Network
- ADB Backup and Restore
Build and Development
- Gradle Build System
- APK Signing Process
- ProGuard and R8 Obfuscation
- Build Variants and Flavors
- Android App Bundles AAB
- Reverse Engineering Tools
Network Security
- Network Security Configuration
- Certificate Pinning
- Cleartext Traffic Handling
- TLS Configuration
- Proxy Detection and Bypass
- Traffic Interception
Cryptography
- Android Keystore API
- Encryption Algorithms
- Hashing Functions
- Secure Random Generation
- Key Attestation
- Biometric Authentication
Setting Up Development Environment
- Hardware Requirements
- Android SDK Installation
- Android Studio Setup
- Android Emulator Configuration
- Physical Device Setup
- Rooting Devices
- Magisk for Root Management
Android Programming Fundamentals
- Java for Android
- Kotlin for Android
- XML Layouts
- Activity Lifecycle Management
- Threading and AsyncTask
- Coroutines in Kotlin
- Networking with Retrofit
Android Tools and Frameworks
- Android Jetpack
- Material Design
- Firebase Integration
- Dependency Injection with Dagger
- Testing Frameworks
- Performance Profiling Tools
Android Forensics Basics
- Logical Data Acquisition
- Physical Data Acquisition
- SQLite Forensics
- File System Artifacts
- Data Recovery Techniques
Testing Fundamentals
Build Pipeline and CI/CD
Introduction to Android
What is Android
Android is open-source mobile operating system Google acquired Android Inc in 2005 and released first commercial Android device (HTC Dream) in 2008 , built on Linux kernel with custom userspace , powers over 2.5 billion active devices worldwide , dominates global smartphone market with 70%+ share , and provides complete software stack from kernel to applications unlike iOS which is closed-source and proprietary
Android Open Source Project (AOSP)
Core Android is completely open source Anyone can download AOSP source code , manufacturers customize Android for their devices , Google apps and services are separate from AOSP , custom ROMs like LineageOS built from AOSP , and open nature enables innovation but also fragmentation
# Download AOSP source (requires ~150GB disk space)
repo init -u https://android.googlesource.com/platform/manifest
repo sync

# Build Android from source
source build/envsetup.sh
lunch aosp_arm64-eng
make -j$(nproc)
Why Understanding Android Matters
Android knowledge is critical for security professionals Mobile devices store sensitive personal and corporate data , apps handle financial transactions and authentication , understanding Android internals enables effective penetration testing , security researchers need deep platform knowledge to find vulnerabilities , and mobile security is increasingly important as smartphones replace traditional computers for many users
Security Perspective
Android's complexity creates attack surface Multiple layers from kernel to apps , inter-process communication mechanisms , permission system that users often don't understand , third-party app stores with less vetting , and understanding architecture helps identify security weaknesses
Development Perspective
Building secure Android apps requires platform knowledge Proper use of Android Keystore , implementing certificate pinning correctly , understanding activity lifecycle to prevent data leaks , using scoped storage appropriately , and following security best practices
Android Ecosystem Overview
Android ecosystem includes multiple stakeholders Google develops AOSP and provides Google Mobile Services (GMS) , device manufacturers (OEMs) like Samsung Xiaomi customize Android , mobile carriers sometimes add bloatware , app developers create applications , and users consume content and services
Fragmentation Challenge
Thousands of device models run different Android versions Manufacturers slow to provide updates , older devices stuck on outdated Android versions with security vulnerabilities , custom skins like OneUI MIUI add complexity , and developers must support wide range of Android versions and screen sizes
# Check Android version distribution
adb shell getprop ro.build.version.release
adb shell getprop ro.build.version.sdk

# View device manufacturer and model
adb shell getprop ro.product.manufacturer
adb shell getprop ro.product.model
Key Android Concepts
Understanding core concepts is essential Every app runs in its own process with unique UID , apps communicate through Intents and Binder IPC , four main component types (Activity Service BroadcastReceiver ContentProvider) , permission system controls access to sensitive resources , and Android Runtime executes app code
Package Name
Unique identifier for every app Reverse domain notation like com.example.app , must be globally unique on Play Store , can't be changed after publishing , and used for app identification throughout system
Application ID
Build-time identifier that can differ from package name Defined in build.gradle , allows different package names for debug and release builds , and useful for having multiple app variants installed simultaneously
Android vs Other Mobile OS
Android differs fundamentally from iOS Android is open source while iOS is closed , Android allows sideloading apps while iOS requires jailbreak , Android has multiple app stores while iOS only has App Store , Android provides more customization while iOS is more locked down , and Android runs on devices from many manufacturers while iOS only on Apple hardware
Security Model Comparison
Both use sandboxing but implementation differs Android uses Linux UIDs for app isolation , iOS uses mandatory access control , Android has more granular permissions , iOS has simpler permission model , Android allows root access on unlocked devices , and iOS jailbreak required for root
Market Position
Android dominates globally while iOS leads in US Android has 70%+ global market share , iOS has 50%+ US market share , Android popular in developing markets , iOS users typically spend more on apps , and both platforms critical for mobile security professionals
Getting Started Resources
Official documentation and tools Android Developer documentation at developer.android.com , AOSP source code at source.android.com , Android Security documentation , Google Codelabs for hands-on tutorials , and Stack Overflow for community support
Essential Tools
Android Studio for development Android SDK command-line tools , ADB for device communication , Emulator for testing , and Gradle for building apps
# Install Android SDK command-line tools
wget https://dl.google.com/android/repository/commandlinetools-linux-latest.zip
unzip commandlinetools-linux-latest.zip
./cmdline-tools/bin/sdkmanager --sdk_root=$HOME/Android/Sdk "platform-tools" "platforms;android-33"

# Verify installation
adb version
Core Architecture
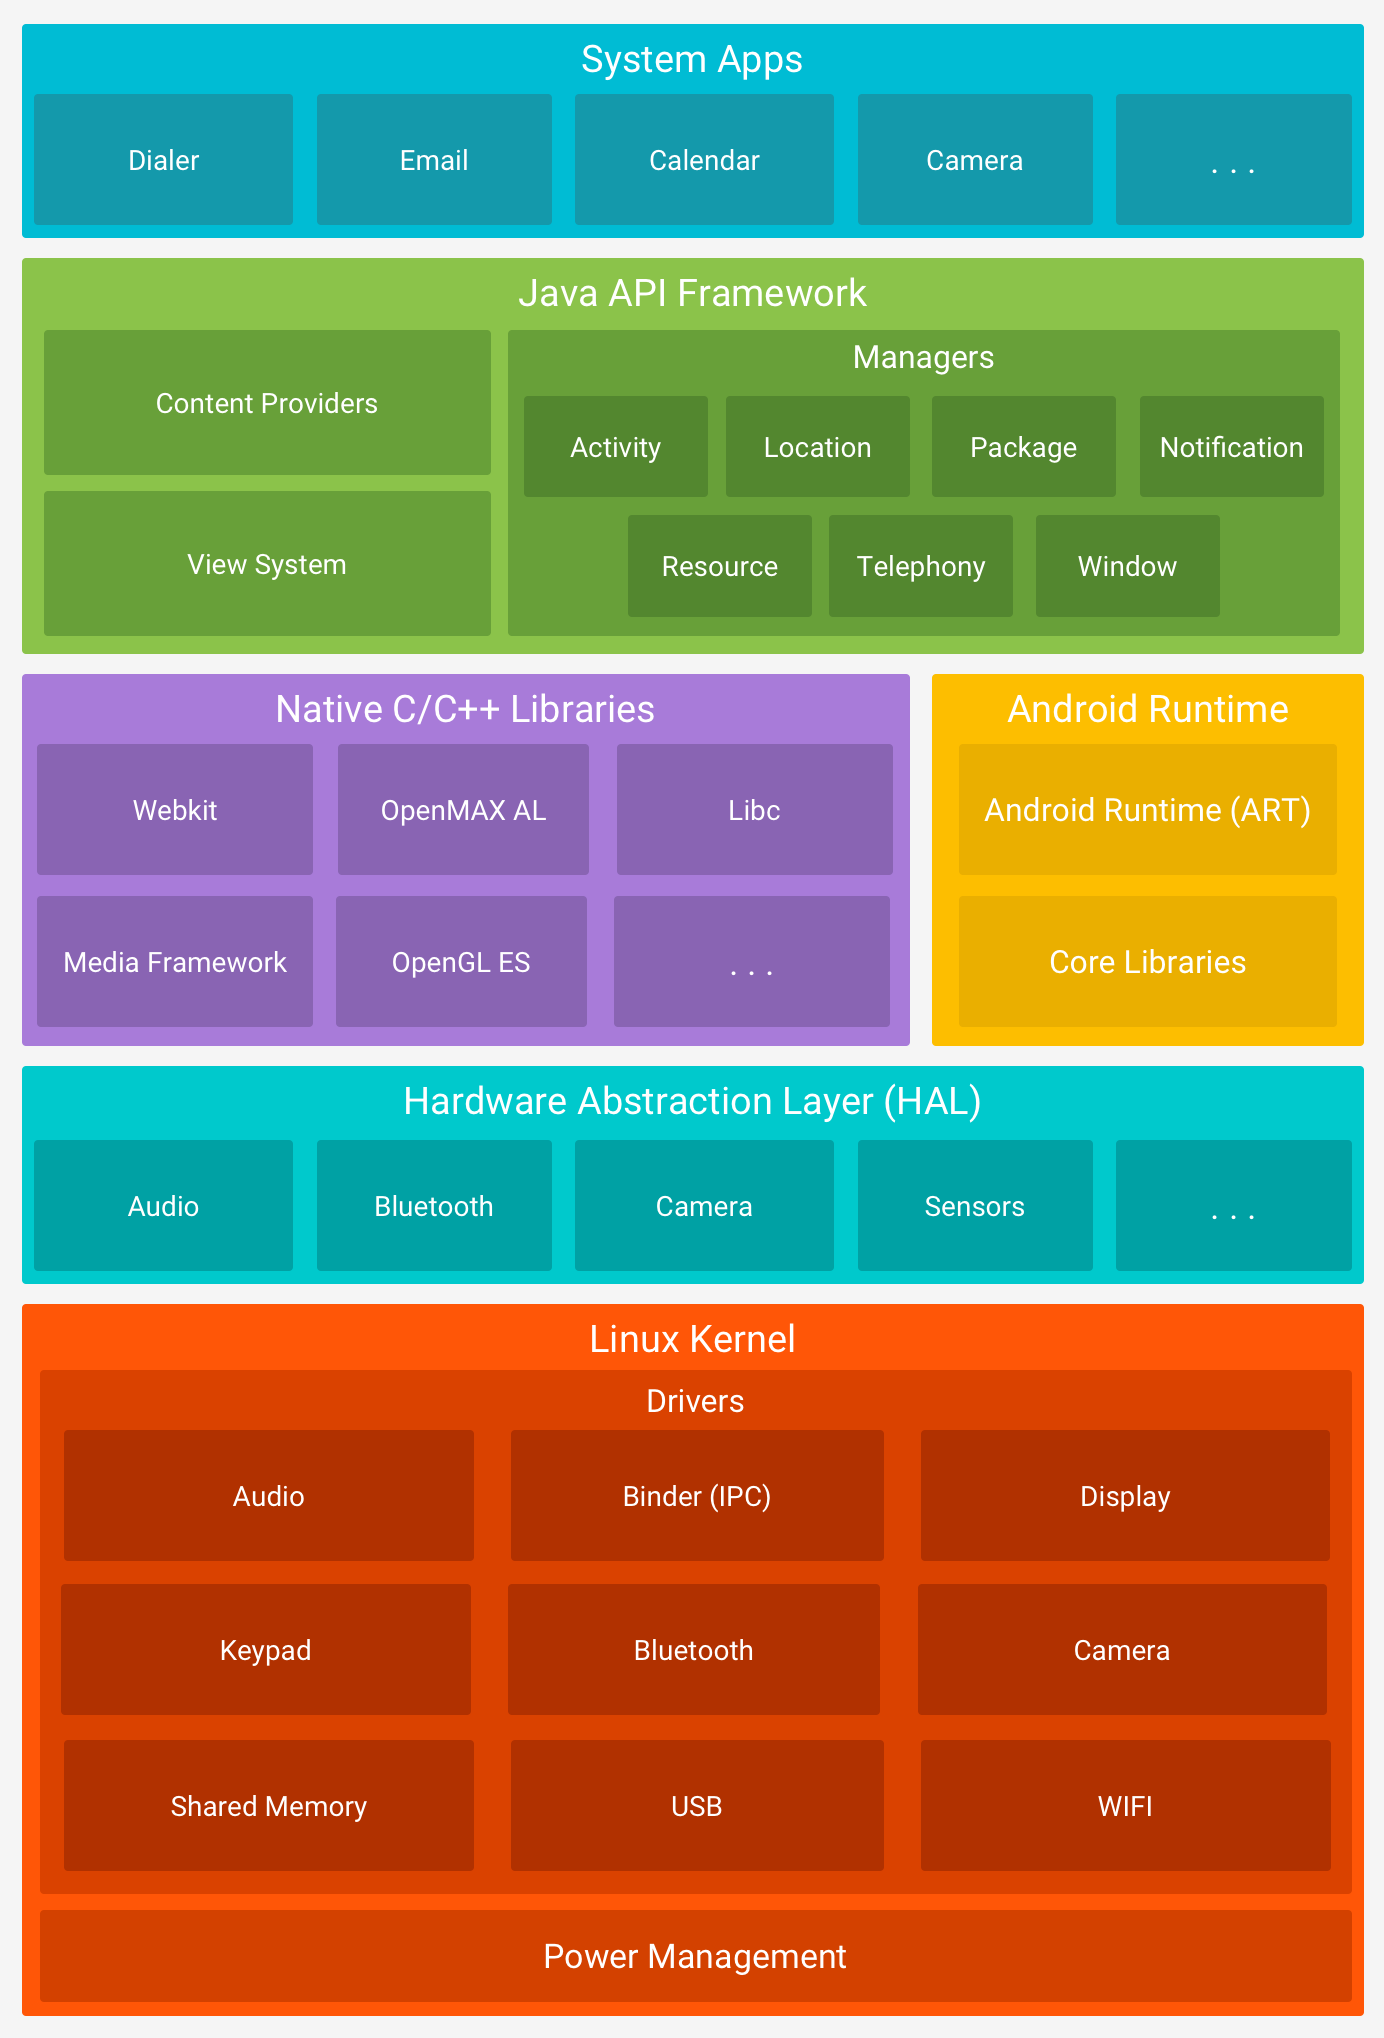
Linux Kernel Foundation
Android runs on modified Linux kernel The whole platform sits on Linux kernel version 4.x or 5.x depending on Android version , and this kernel layer handles every low-level operation from process scheduling to memory management to hardware driver interfaces through battle-tested code that's been refined over decades of Linux development in production environments
# Check kernel version
adb shell cat /proc/version

# View kernel configuration
adb shell cat /proc/config.gz | gunzip | grep ANDROID

# Check kernel command line
adb shell cat /proc/cmdline
Why Linux though Google picked Linux kernel because it already had mature process management with proven schedulers , extensive hardware driver ecosystem supporting thousands of devices , robust security features like SELinux capabilities and namespaces , plus the whole codebase is open source so manufacturers can customize and optimize without licensing restrictions or vendor lock-in
Process Management
Kernel manages all running processes When you launch an app the kernel spawns new process with unique PID , assigns CPU time using Completely Fair Scheduler (CFS) that ensures fair distribution , manages process priorities based on foreground versus background state , handles process cleanup when apps exit or get killed , and coordinates inter-process communication through Binder which is way more efficient than traditional Linux IPC mechanisms
# List all running processes
adb shell ps -A

# Check specific app process
adb shell pidof com.example.app

# View detailed process info
adb shell cat /proc/$(adb shell pidof com.example.app)/status

# Monitor process CPU usage
adb shell top -n 1 | grep com.example
Memory Management
Each process lives in isolated virtual address space The kernel maps physical RAM to virtual addresses for each process ensuring complete isolation , implements copy-on-write for efficient memory sharing between parent and child processes , uses zRAM for compressed swap on memory-constrained devices , monitors memory pressure constantly through various thresholds , and triggers appropriate cleanup actions before system runs completely out of available memory which would cause crashes
# View memory info
adb shell cat /proc/meminfo

# Check app memory usage
adb shell dumpsys meminfo com.example.app

# View memory maps
adb shell cat /proc/$(adb shell pidof com.example.app)/maps

# Check zRAM status
adb shell cat /proc/swaps
Device Drivers
Kernel drivers connect Android to hardware Display drivers interface with GPU and screen controllers for rendering , input drivers handle touchscreen digitizers and physical buttons , network drivers manage WiFi chipsets and cellular modems , storage drivers control flash memory through eMMC or UFS interfaces , sensor drivers communicate with accelerometer gyroscope magnetometer and other MEMS sensors , camera drivers interface with image sensors and ISPs , audio drivers route sound through various output paths like speakers headphones and Bluetooth
# List loaded kernel modules
adb shell lsmod

# View driver info
adb shell cat /proc/devices

# Check input devices
adb shell getevent -l
SELinux Enforcement
Security Enhanced Linux runs in enforcing mode Every process runs in specific SELinux domain with tightly restricted permissions , policies define exactly what each domain can access down to individual files and system calls , apps can't escape their sandbox even if they find kernel vulnerabilities because SELinux blocks unauthorized operations , and the whole system enforces mandatory access control on top of traditional discretionary access control that standard Unix systems use
# Check SELinux status
adb shell getenforce

# View process SELinux contexts
adb shell ps -Z

# Check file contexts
adb shell ls -Z /data/data/

# View SELinux denials in real-time
adb shell dmesg | grep avc
Android-Specific Kernel Modifications
Google added custom components to vanilla Linux Binder IPC provides efficient inter-process communication optimized for mobile , wakelocks prevent device from sleeping during critical operations like downloads , ashmem (Anonymous Shared Memory) manages memory sharing for graphics buffers , ION allocator handles memory allocation for camera and video subsystems , Android logger provides kernel-level logging infrastructure that logcat reads from , Low Memory Killer proactively terminates processes based on oom_adj scores rather than waiting for complete memory exhaustion like standard Linux OOM killer does
# Check Binder stats
adb shell cat /sys/kernel/debug/binder/stats

# View wakelock usage
adb shell cat /sys/kernel/debug/wakeup_sources

# Check ION heaps
adb shell cat /sys/kernel/debug/ion/heaps/*
Hardware Abstraction Layer
HAL sits between kernel drivers and Android framework The Hardware Abstraction Layer provides standardized interfaces so Android framework doesn't need device-specific code for every single hardware component from different manufacturers , which means Samsung camera sensors and Sony camera sensors both expose identical API to framework even though their underlying implementations and capabilities are completely different
Why HAL Exists
Different manufacturers use wildly different hardware One phone uses Sony IMX sensor while another uses Samsung ISOCELL , audio codecs vary between Qualcomm Aqstic and Cirrus Logic chips , display controllers differ across Samsung AMOLED and LG OLED panels , storage interfaces range from older eMMC to modern UFS to cutting-edge NVMe , and without HAL the framework would need custom code for every possible hardware combination which would be absolutely unmaintainable nightmare
HAL Architecture
Standard interface definition plus vendor-specific implementation Framework calls standardized HAL methods like camera_device_open() without knowing or caring which actual hardware sits underneath , manufacturers implement HAL interfaces for their specific components following Google's specifications , the whole system loads appropriate HAL modules at runtime based on device configuration and hardware detection , and this abstraction enables framework updates without touching vendor code
# List HAL modules on device
adb shell ls /vendor/lib/hw/
adb shell ls /vendor/lib64/hw/

# Common HAL module examples:
# camera.default.so - Camera HAL
# audio.primary.default.so - Audio HAL
# sensors.default.so - Sensors HAL
# gralloc.default.so - Graphics memory allocator

# Check loaded HAL libraries
adb shell lsof | grep /vendor/lib/hw/
HAL Evolution
Three generations of HAL implementations exist Legacy HAL used simple C-based interfaces that are mostly deprecated now , HIDL (Hardware Interface Definition Language) introduced in Android 8.0 uses interface description language for better versioning and compatibility , AIDL HAL is the modern replacement using Android Interface Definition Language that provides better performance easier maintenance and cleaner separation between framework and vendor code
# List HIDL services
adb shell lshal

# Check AIDL services
adb shell dumpsys -l | grep aidl

# View HAL interface versions
adb shell lshal --types=b,c,l,z
Common HAL Modules
Camera HAL controls image capture pipeline Audio HAL routes sound through speakers microphones and audio processors , Sensors HAL reads data from accelerometer gyroscope magnetometer proximity and ambient light sensors , Graphics HAL manages GPU rendering and display composition , Bluetooth HAL handles wireless connectivity and profiles , GPS HAL provides location data from GNSS receivers , and each module translates high-level framework requests into low-level hardware-specific commands
Android Runtime ART vs Dalvik
ART completely replaced Dalvik runtime Android Runtime became default in Android 5.0 Lollipop after being optional developer setting in 4.4 KitKat , and this fundamental switch from just-in-time compilation to ahead-of-time compilation changed how apps execute on Android devices with massive performance improvements that users immediately noticed in app launch speed and overall responsiveness
Dalvik Virtual Machine - The Old Way
Dalvik used JIT compilation during execution Apps compiled to DEX bytecode at build time , Dalvik interpreted bytecode or JIT compiled to native code during app execution which caused noticeable lag spikes , each app ran in separate Dalvik VM instance with its own memory overhead , garbage collection paused apps for 100+ milliseconds causing UI jank , and the whole system felt sluggish especially on lower-end devices with limited RAM and slower processors
# Check if device uses Dalvik (old devices only)
adb shell getprop dalvik.vm.heapsize

# View Dalvik VM settings
adb shell getprop | grep dalvik
ART - The Modern Runtime
ART uses ahead-of-time compilation When you install APK the system runs dex2oat compiler in background , DEX bytecode gets converted to native machine code optimized for device CPU architecture , compiled code stores in OAT (Optimized Android file Type) files , apps launch significantly faster because they execute native code directly without runtime compilation overhead , and battery life improves because CPU doesn't waste cycles on JIT compilation during execution
# View compiled OAT files
adb shell ls /data/app/*/oat/

# Check compilation status
adb shell cmd package compile -m speed-profile -f com.example.app

# View compilation stats
adb shell dumpsys package dexopt

# Force full AOT compilation
adb shell cmd package compile -m speed -f com.example.app
Garbage Collection Improvements
ART garbage collector is dramatically better Concurrent GC runs alongside app code instead of stopping everything , generational collection separates young short-lived objects from old long-lived objects for more efficient cleanup , parallel threads speed up collection process using multiple CPU cores , compacting GC reduces memory fragmentation , and GC pause times dropped from 100ms in Dalvik down to 5-10ms in ART which makes animations smooth and UI responsive without stuttering
Profile-Guided Optimization
System learns app behavior over time ART monitors which methods execute frequently during normal usage , stores execution profiles in /data/misc/profiles/ directory , recompiles hot code paths with aggressive optimizations while leaving cold code alone , and this adaptive approach balances performance with storage space better than pure AOT compilation
# View app execution profiles
adb shell ls /data/misc/profiles/cur/0/

# Dump profile information
adb shell cmd package dump-profiles com.example.app

# Clear profiles to reset optimization
adb shell cmd package clear-profiles com.example.app
Hybrid Compilation Strategy
Modern ART uses mixed approach Apps install quickly with minimal initial compilation to avoid long install times , frequently used code gets AOT compiled based on usage profiles , rarely executed code stays as bytecode and interprets or JIT compiles on demand , background dex optimization runs during device idle time , and this intelligent balance between performance and storage works way better than pure AOT or pure JIT strategies
Native Libraries Layer
Native code handles performance-critical operations Apps and system services use compiled C/C++ libraries for tasks that need maximum performance , these shared libraries (.so files) provide functionality that Java/Kotlin code calls through JNI (Java Native Interface) , and understanding native libraries is crucial because they handle graphics rendering , media codecs , cryptography , and other computationally intensive operations
System Native Libraries
Bionic is Android's custom C library Unlike desktop Linux using glibc , Android uses Bionic which is smaller faster and optimized specifically for mobile devices , located at /system/lib/libc.so for 32-bit and /system/lib64/libc.so for 64-bit architectures , provides standard C functions like malloc printf and file operations , and every native component links against Bionic for core functionality
# List system libraries
adb shell ls /system/lib/*.so | head -20
adb shell ls /system/lib64/*.so | head -20

# Check library dependencies
adb shell readelf -d /system/lib64/libc.so

# View library symbols
adb shell nm -D /system/lib64/libc.so | head -20
Critical System Libraries
SQLite provides embedded database engine libsqlite.so implements full SQL database that apps use through Java APIs , handles all database operations in native code for performance , supports transactions indexes and complex queries , and pretty much every app uses SQLite for structured data storage
OpenSSL or BoringSSL handles cryptography Provides TLS/SSL implementation for secure network communications , implements encryption algorithms like AES and RSA , handles certificate validation and key exchange , and BoringSSL is Google's fork optimized for Android with reduced attack surface
# Find SQLite library
adb shell find /system -name "*sqlite*.so"

# Check OpenSSL/BoringSSL
adb shell find /system -name "*ssl*.so"
App Native Libraries
Apps bundle architecture-specific native code APK contains lib/ directory with subdirectories for each CPU architecture , armeabi-v7a for 32-bit ARM devices , arm64-v8a for 64-bit ARM (most modern devices) , x86 and x86_64 for Intel-based devices and emulators , and Android loads appropriate library based on device CPU
# Extract native libs from APK
unzip -l app.apk | grep "lib/.*\.so$"

# Check loaded libraries for running app
adb shell cat /proc/$(adb shell pidof com.example.app)/maps | grep "\.so"

# View library architecture
adb shell readelf -h /data/app/*/lib/arm64/libexample.so
JNI Bridge
Java code calls native methods through JNI Apps declare native methods in Java classes , load libraries using System.loadLibrary() , native code implements functions following specific naming convention , and JNI provides type mapping between Java objects and C/C++ types
// Java side declaration
public class NativeLib {
    static {
        System.loadLibrary("mylib");
    }
    public native String getMessage();
}
// Native implementation
#include <jni.h>

extern "C" JNIEXPORT jstring JNICALL
Java_com_example_NativeLib_getMessage(JNIEnv *env, jobject thiz) {
    return env->NewStringUTF("Hello from native");
}
Application Framework
Framework provides high-level APIs for app development The Application Framework sits on top of native libraries and runtime , exposing Java/Kotlin APIs that developers use daily , and this layer includes all the manager classes that handle activities , services , notifications , and every other Android feature
Core System Services
ActivityManager controls app lifecycle Manages activity stack and task switching , decides which processes to keep in memory , kills background processes when memory runs low , and maintains process priority levels
# View activity stack
adb shell dumpsys activity activities

# Check running services
adb shell dumpsys activity services

# View process priorities
adb shell dumpsys activity processes
PackageManager handles installed applications Provides metadata about installed packages , manages app permissions , resolves intents to components , and maintains package database
# List installed packages
adb shell pm list packages

# Get package info
adb shell dumpsys package com.example.app

# View package permissions
adb shell dumpsys package com.example.app | grep permission
WindowManager draws UI on screen Controls window placement and z-ordering , manages status bar and navigation bar , handles screen rotation , and coordinates with SurfaceFlinger for rendering
# View window hierarchy
adb shell dumpsys window windows

# Check display info
adb shell dumpsys display
Additional System Services
LocationManager provides GPS data NotificationManager displays notifications , AlarmManager schedules tasks , ConnectivityManager monitors network , PowerManager controls wake locks , and each service runs as system process
# List all system services
adb shell service list

# Dump specific service
adb shell dumpsys location
adb shell dumpsys notification
System Apps vs User Apps
Android distinguishes between system and user applications System apps pre-installed in /system/app/ , user apps install to /data/app/ , and this affects permissions and capabilities
System Apps
Pre-installed in system partition Can't be uninstalled by users , survive factory reset , can request signature permissions , and often signed with platform certificate
# List system apps
adb shell ls /system/app/
adb shell ls /system/priv-app/

# Check if app is system app
adb shell dumpsys package com.example.app | grep pkgFlags
User Apps
Installed by users from Play Store Located in /data/app/ , can be uninstalled , wiped during factory reset , and restricted to public APIs
# List user-installed apps
adb shell pm list packages -3

# Get app install location
adb shell pm path com.example.app
Zygote Process
Zygote is the mother of all app processes When device boots Zygote process starts and preloads framework classes and resources , every app process is forked from Zygote which makes app startup faster , and this copy-on-write approach saves memory by sharing common framework code
How Zygote Works
System starts Zygote at boot Zygote loads Android framework into memory , preloads commonly used classes , initializes ART runtime , listens on socket for app launch requests , and forks new process for each app
# Check Zygote process
adb shell ps -A | grep zygote

# View Zygote socket
adb shell ls -l /dev/socket/zygote
Process Forking
When app needs to start ActivityManager sends request to Zygote , Zygote forks new process , child process inherits preloaded framework , process specializes for specific app , and this is way faster than loading framework from scratch
Binder IPC Mechanism
Binder enables inter-process communication Android apps and services need to communicate across process boundaries , Binder provides efficient IPC mechanism optimized for mobile , and it's fundamental to how Android components interact
Why Binder
Traditional Linux IPC isn't good enough Sockets have too much overhead , shared memory needs complex synchronization , pipes are unidirectional , and Binder provides object-oriented RPC with built-in security
How Binder Works
Kernel driver facilitates communication Client process makes method call , Binder driver marshals data , transfers to server process , server executes method , and result returns through Binder
# View Binder stats
adb shell cat /sys/kernel/debug/binder/stats

# Check Binder transactions
adb shell cat /sys/kernel/debug/binder/transactions

# View Binder processes
adb shell cat /sys/kernel/debug/binder/proc/*
AIDL Interface
Apps define interfaces in AIDL Android Interface Definition Language describes service methods , compiler generates Java stubs , and apps use generated code for IPC
Android System Services
System services provide core Android functionality Services run in system_server process , apps access through Binder IPC , provide APIs for hardware and system features , and include ActivityManager PackageManager WindowManager LocationManager and dozens more
Key System Services
ActivityManagerService manages app lifecycle Starts activities and services , manages task stack , handles process priorities , implements OOM killer decisions , and coordinates app transitions
PackageManagerService handles app installation Parses APK files , verifies signatures , manages permissions , tracks installed apps , and provides app metadata
WindowManagerService controls display Manages windows and surfaces , handles touch events , coordinates animations , implements screen rotation , and manages status bar and navigation bar
# List all system services
adb shell service list

# Dump specific service info
adb shell dumpsys activity
adb shell dumpsys package
adb shell dumpsys window

# Check service status
adb shell dumpsys | grep "DUMP OF SERVICE"
Service Manager
Central registry for system services Binder-based service lookup , services register with ServiceManager , apps query ServiceManager to find services , and provides service discovery mechanism
# View ServiceManager
adb shell service check servicemanager

# Get service handle
adb shell service call activity 1  # Call method 1 on ActivityManager
Native System Services
Some services implemented in C++ SurfaceFlinger for display composition , AudioFlinger for audio mixing , MediaServer for media playback , and CameraService for camera access
# Check native services
adb shell ps -A | grep -E "surfaceflinger|audioserver|cameraserver"

# View SurfaceFlinger info
adb shell dumpsys SurfaceFlinger
Over the Air Updates
OTA updates deliver Android system updates Manufacturers push updates wirelessly , updates include security patches and new features , A/B partitioning enables seamless updates , and recovery mode handles update installation
Update Process
Device checks for updates periodically Connects to OEM update server , downloads update package , verifies cryptographic signature , and installs during reboot or in background with A/B
# Check for updates manually
adb shell am start -a android.settings.SYSTEM_UPDATE_SETTINGS

# View update status
adb shell getprop ro.build.version.security_patch
adb shell getprop ro.build.version.incremental

# Check A/B update status
adb shell getprop ro.boot.slot_suffix
adb shell getprop ro.build.ab_update
A/B System Updates
Seamless updates without downtime Two system partitions (A and B) , update installs to inactive partition , device boots from new partition , and rollback possible if update fails
# Check current active slot
adb shell getprop ro.boot.slot_suffix

# View both partition sets
adb shell ls -l /dev/block/by-name/ | grep -E "_a|_b"

# Check update engine status
adb shell dumpsys update_engine
Update Package Structure
OTA packages contain system images Full updates include entire system image , incremental updates contain only changes , signed with OEM private key , and verified before installation
# Extract OTA package (if you have one)
unzip ota_package.zip -d ota_extracted/

# View update metadata
cat ota_extracted/META-INF/com/google/android/updater-script

# Check package signature
jarsigner -verify -verbose ota_package.zip
Recovery Mode
Special boot mode for system updates Minimal Linux environment , mounts system partitions , applies update package , verifies installation , and reboots to updated system
# Boot to recovery
adb reboot recovery

# View recovery logs
adb shell cat /cache/recovery/last_log

# Sideload OTA update
adb sideload ota_package.zip
Security Model

Application Sandboxing
Every app runs completely isolated Application sandboxing implemented through Linux UIDs and file permissions , apps can't access each other's data , and kernel enforces isolation automatically
UID-Based Isolation
Each app gets unique Linux user ID PackageManager assigns UID starting from 10000 , UID stays constant across updates , app process runs as that UID , and kernel enforces file access restrictions
# View app UID
adb shell dumpsys package com.example.app | grep userId

# Check running processes with UIDs
adb shell ps -o PID,USER,NAME | grep com.example
File System Isolation
App data directory owned by app's UID Directory at /data/data/package.name/ with permissions 700 , only app and root can access , and other apps get permission denied
# Check app data permissions
adb shell ls -la /data/data/ | grep com.example

# Try accessing another app's data
adb shell cat /data/data/com.other.app/databases/data.db
# Permission denied
Process Isolation
Separate Linux processes for each app Apps can't access other app's memory , kernel prevents cross-process reads , and debugger can't attach without root
UID Separation and Isolation
Linux UIDs enforce app isolation Android assigns unique UID from specific ranges , system apps use lower UIDs , regular apps start at 10000 , and kernel enforces boundaries
UID Ranges
System uses defined UID ranges Root is UID 0 , system services 1000-9999 , user apps 10000+ , isolated processes 99000+ , and each range has security implications
# View UID assignments
adb shell cat /data/system/packages.xml | grep userId=

# List processes by UID
adb shell ps -o UID,NAME | sort -n
GID Assignment
Apps get group IDs for permissions INTERNET permission adds inet GID , WRITE_EXTERNAL_STORAGE adds sdcard_rw , and kernel checks GID membership
# View process UIDs and GIDs
adb shell cat /proc/$(adb shell pidof com.example.app)/status | grep -E "Uid|Gid"
SELinux Implementation
SELinux adds mandatory access control Security-Enhanced Linux runs in enforcing mode , provides additional security layer , and prevents privilege escalation
SELinux Domains
Each process runs in specific domain Apps run in untrusted_app domain , system services have dedicated domains , and policies define access rules
# Check SELinux status
adb shell getenforce

# View process contexts
adb shell ps -Z | grep com.example

# Check file contexts
adb shell ls -Z /data/data/
Policy Enforcement
SELinux policies define allowed operations Even root can't bypass enforcing mode , policies in /system/etc/selinux/ , and violations get logged and blocked
# View SELinux denials
adb shell dmesg | grep avc

# Check policy version
adb shell cat /sys/fs/selinux/policyvers
Verified Boot Chain
Boot verification prevents tampering Verified Boot ensures device boots trusted code , starts from hardware root of trust , and extends through bootloader to system
Boot Stages
Hardware verifies bootloader Bootloader verifies boot partition , boot verifies system partition , and each stage checks signature
dm-verity
Kernel verifies system partition blocks Device-mapper verity checks hash tree , any modification triggers failure , and system can fail boot or warn
# Check verity status
adb shell getprop ro.boot.veritymode

# Disable verity (requires unlocked bootloader)
adb disable-verity
SafetyNet Attestation
Google's device integrity check SafetyNet verifies device hasn't been tampered , checks bootloader state , detects root , and validates system integrity
What SafetyNet Checks
Bootloader lock status Unlocked bootloader fails , locked required for CTS , and prevents custom ROMs
Root detection Checks for su binary , detects Magisk , scans for root apps , and rooted devices fail
System modifications Verifies system partition , checks for custom recovery , detects Xposed , and tampering causes failure
Play Protect
Google's malware scanner Play Protect scans apps before and after install , runs in background , uses machine learning , and provides real-time protection
How It Works
Scans apps continuously Checks against malware database , analyzes behavior patterns , sends metadata to Google , and warns about harmful apps
Android Protected Confirmation
Hardware-backed user confirmation for critical transactions Protected Confirmation API provides tamper-proof UI for user consent , runs in TrustZone isolated from Android , prevents malware from faking user approval , and used for high-value transactions like payments or sensitive data access
Use Cases
Critical operations requiring verified user consent Financial transactions above certain threshold , accessing highly sensitive data , authorizing irreversible actions , and enterprise policy enforcement
How It Works
Confirmation UI runs in secure environment App requests protected confirmation with message , TrustZone displays UI that Android can't intercept , user approves or denies in secure UI , and cryptographically signed response proves user consent
// Request protected confirmation
ConfirmationPrompt prompt = new ConfirmationPrompt.Builder(this)
    .setPromptText("Authorize payment of $500?")
    .setExtraData(transactionData)  // Bound to confirmation
    .build();

prompt.presentPrompt(executor, new ConfirmationCallback() {
    @Override
    public void onConfirmed(byte[] dataThatWasConfirmed) {
        // User confirmed in secure UI
        // dataThatWasConfirmed is cryptographically signed
        processTransaction(dataThatWasConfirmed);
    }

    @Override
    public void onDismissed() {
        // User cancelled
    }

    @Override
    public void onCanceled() {
        // System cancelled (e.g., screen off)
    }

    @Override
    public void onError(Throwable e) {
        // Error occurred
    }
});
Security Guarantees
Malware can't fake confirmation UI rendered in TrustZone not Android , screen content protected from screenshots , Android can't intercept or modify displayed message , and signed response proves authentic user action
# Check if device supports protected confirmation
adb shell pm list features | grep android.hardware.security.model.compatible

# Not all devices support this - requires specific hardware
Limitations
Not widely available yet Requires StrongBox or equivalent secure hardware , only on high-end devices , limited adoption by apps , and fallback to regular confirmation needed
TrustZone Technology
Hardware-based security environment ARM TrustZone creates isolated secure world , runs alongside normal world , handles sensitive operations , and provides hardware root of trust that can't be compromised even if Android OS is completely rooted or infected with malware because the secure world operates at a lower privilege level than the normal world kernel
TrustZone Architecture
CPU switches between two worlds Normal World runs Android OS and all apps , Secure World runs Trusted Execution Environment (TEE) , hardware enforces isolation between worlds , and CPU switches contexts through secure monitor mode that acts as gatekeeper controlling all transitions between the two execution environments
# Check if device supports TrustZone
adb shell cat /proc/cpuinfo | grep -i "security"

# View TEE implementation
adb shell getprop | grep tee

# Check for Trusty TEE (Google's implementation)
adb shell getprop ro.hardware.keystore
Secure World
Isolated execution environment completely separate from Android Secure World has own kernel called Trusted OS , runs Trusted Applications (TAs) for sensitive operations , accesses dedicated secure memory that Normal World can't read , uses separate interrupt handlers , and even if attacker gains kernel-level access in Normal World they still can't access Secure World resources or extract keys stored there
Normal World to Secure World Communication
Apps communicate with TEE through client APIs Android app calls TEE client library , library triggers Secure Monitor Call (SMC) instruction , CPU switches to Secure Monitor mode , Secure Monitor validates request and switches to Secure World , Trusted Application processes request in isolation , result returns through same path , and entire process is transparent to application developer
# Check TEE services
adb shell ls /dev/trusty* 2>/dev/null || echo "Trusty not found"

# View TEE-related processes
adb shell ps -A | grep -i "tee\|trusty"

# Check for QSEE (Qualcomm Secure Execution Environment)
adb shell ls /dev/qseecom 2>/dev/null || echo "QSEE not found"
Use Cases
Biometric authentication runs entirely in TrustZone Fingerprint sensor data goes directly to Secure World , matching algorithms execute in TEE , Android only receives yes/no result , and fingerprint templates never leave secure storage which means even root access can't extract your actual fingerprint data
Cryptographic keys stored in secure hardware Android Keystore uses TEE for key storage , private keys generated in Secure World , crypto operations happen in TEE , keys never exposed to Normal World , and this provides hardware-backed key attestation proving keys exist in secure hardware
DRM content protection through TEE Encrypted video streams decrypt in Secure World , decrypted frames go directly to display hardware through secure path , Normal World never sees unencrypted content , and this enables Netflix 4K and other premium content on mobile devices
Secure payment processing Payment credentials stored in TEE , transaction signing happens in Secure World , Google Pay and Samsung Pay use this , and even compromised Android can't steal payment tokens
TEE Implementations
Different manufacturers use different TEE solutions Qualcomm devices use QSEE (Qualcomm Secure Execution Environment) , Samsung uses TEEGRIS , Google Pixel uses Trusty , MediaTek uses Kinibi , and each implementation follows GlobalPlatform TEE specifications but with vendor-specific extensions
# Identify TEE implementation
adb shell getprop ro.hardware
adb shell getprop ro.vendor.qti.va_aosp.support  # Qualcomm
adb shell getprop ro.hardware.gatekeeper  # Check gatekeeper implementation

# View TEE version
adb shell getprop ro.boot.trusty_version 2>/dev/null || echo "Not Trusty"
Security Guarantees
TrustZone provides hardware-enforced isolation Memory Management Unit (MMU) prevents Normal World from accessing Secure World memory , CPU enforces privilege separation , secure boot ensures only signed Trusted OS loads , and hardware fuses store root keys that can't be read by software making TrustZone the foundation of Android's hardware security model
Hardware Security Module
Dedicated crypto processor for cryptographic operations HSM is specialized hardware component that stores cryptographic keys in tamper-resistant environment , prevents key extraction even with physical device access , provides hardware-backed cryptographic operations , and acts as root of trust for the entire device security model making it impossible to extract private keys through software exploits
HSM Architecture
Separate secure processor with dedicated memory HSM has own CPU isolated from main processor , dedicated secure RAM that main CPU can't access , hardware random number generator for key generation , tamper detection circuits that erase keys if physical attack detected , and secure storage with encryption at rest using keys burned into hardware fuses during manufacturing
# Check for hardware-backed keystore
adb shell getprop ro.hardware.keystore

# View keystore implementation
adb shell getprop ro.crypto.type

# Check if StrongBox available (dedicated HSM chip)
adb shell pm list features | grep android.hardware.strongbox_keystore
Android Keystore Integration
Keystore API abstracts HSM access When app generates key with AndroidKeyStore provider , key creation happens entirely in HSM , private key material never exists in Android memory , all crypto operations execute in secure hardware , and API returns only operation results never the actual key bytes
Key Lifecycle in HSM
Keys generated inside secure boundary App requests key generation with specific parameters , HSM generates random key using hardware RNG , key stored in secure memory with access controls , HSM assigns key alias for future reference , and private key never leaves HSM throughout entire lifecycle
# List keys in Android Keystore
adb shell dumpsys keystore

# Check key attestation support
adb shell getprop ro.hardware.keystore_desede

# View keymaster version (HSM interface)
adb shell getprop ro.hardware.keymaster
Cryptographic Operations
All operations happen in HSM App sends plaintext/ciphertext to HSM through Keystore API , HSM performs encryption/decryption/signing using stored key , result returns to app , and key never exposed to Android OS or app process which means even kernel-level exploit can't steal keys
Hardware-Backed Attestation
HSM proves key properties Key attestation generates certificate chain signed by device's attestation key , certificate includes key properties like algorithm and purpose , proves key exists in hardware not software , includes device security state like bootloader lock status , and remote server can verify certificate to ensure key is hardware-backed
// Request hardware-backed key with attestation
KeyGenParameterSpec spec = new KeyGenParameterSpec.Builder(
    "my_key",
    KeyProperties.PURPOSE_SIGN | KeyProperties.PURPOSE_VERIFY)
    .setAttestationChallenge(challenge)  // Enable attestation
    .setDigests(KeyProperties.DIGEST_SHA256)
    .build();

KeyPairGenerator keyGen = KeyPairGenerator.getInstance(
    KeyProperties.KEY_ALGORITHM_RSA, "AndroidKeyStore");
keyGen.initialize(spec);
KeyPair keyPair = keyGen.generateKeyPair();

// Get attestation certificate chain
Certificate[] chain = keyStore.getCertificateChain("my_key");
StrongBox Keymaster
Dedicated secure element for highest security StrongBox is separate tamper-resistant chip (not just TrustZone) , provides even stronger isolation than TEE , used for most sensitive keys , slower than TEE but more secure , and available on high-end devices starting Android 9
# Check StrongBox availability
adb shell pm list features | grep strongbox

# Generate key in StrongBox
# Use setIsStrongBoxBacked(true) in KeyGenParameterSpec
Security Guarantees
HSM provides multiple layers of protection Keys can't be extracted through software exploits , side-channel attacks mitigated by hardware design , tamper detection erases keys on physical attack , rate limiting prevents brute force , and attestation proves key security properties to remote parties
Key Deletion
Secure key erasure When key deleted the HSM securely wipes key material , uses cryptographic erasure techniques , and ensures deleted keys can't be recovered even with physical chip analysis
# Delete key from keystore
# Keys automatically deleted when app uninstalled
adb shell pm uninstall com.example.app  # Removes all app keys
File System and Storage
System Partitions Layout
Android uses multiple partitions File system splits across partitions , each serves specific purpose , and understanding layout is crucial
/system partition
Contains Android OS Mounted read-only , includes framework JARs , system libraries , pre-installed apps , and core components
# View system partition
adb shell mount | grep /system

# List contents
adb shell ls /system/

# Check size
adb shell df -h /system
/data partition
Stores user data and apps Contains app data directories , installed APKs , system settings , and gets wiped during factory reset
# View data partition
adb shell ls /data/

# Check usage
adb shell df -h /data
/vendor partition
Manufacturer-specific code HAL implementations , proprietary drivers , device binaries , and enables system updates
# View vendor partition
adb shell ls /vendor/

# Check HAL modules
adb shell ls /vendor/lib/hw/
/boot partition
Kernel and ramdisk Bootloader loads this , includes kernel image , ramdisk with init , and device tree blob
/recovery partition
Recovery environment Minimal Android for recovery , handles OTA updates , performs factory reset , and fixes broken installations
Data Directory Structure
Apps store data in /data/data/package/ Contains databases preferences files cache , and understanding structure is essential
Standard Subdirectories
Each app gets consistent structure databases/ for SQLite , shared_prefs/ for XML preferences , files/ for internal storage , cache/ for temporary data , and code_cache/ for optimized code
# View app structure
adb shell ls -la /data/data/com.example.app/
databases/ Directory
SQLite database files Main databases with .db extension , journal files for transactions , and can be pulled for analysis
# List databases
adb shell ls /data/data/com.example.app/databases/

# Pull database
adb pull /data/data/com.example.app/databases/main.db

# Query database
adb shell sqlite3 /data/data/com.example.app/databases/main.db "SELECT * FROM users;"
shared_prefs/ Directory
XML preference files Key-value pairs for settings , often contains sensitive data , and each file is separate XML
# View preferences
adb shell cat /data/data/com.example.app/shared_prefs/settings.xml
Internal Storage
App-private storage in /data/data/package/ Files stored here are private to app by default , automatically deleted on uninstall , limited by device storage , and provides secure storage for sensitive data
File Operations
Apps use standard Java file I/O
// Write to internal storage
String filename = "myfile.txt";
String content = "Hello World";
FileOutputStream fos = openFileOutput(filename, Context.MODE_PRIVATE);
fos.write(content.getBytes());
fos.close();

// Read from internal storage
FileInputStream fis = openFileInput(filename);
InputStreamReader isr = new InputStreamReader(fis);
BufferedReader br = new BufferedReader(isr);
String line = br.readLine();
br.close();
Storage Locations
Multiple methods to get internal paths
// App's private files directory
File filesDir = getFilesDir();  // /data/data/package/files/

// Cache directory
File cacheDir = getCacheDir();  // /data/data/package/cache/

// Code cache directory
File codeCacheDir = getCodeCacheDir();  // /data/data/package/code_cache/
# View internal storage usage
adb shell du -sh /data/data/com.example.app/

# List all files
adb shell find /data/data/com.example.app/ -type f

# Check file permissions
adb shell ls -lR /data/data/com.example.app/
Security Considerations
Internal storage is private but not encrypted by default Files readable if device rooted , sensitive data should be encrypted , use Android Keystore for encryption keys , and avoid storing secrets in plain text
// Encrypt sensitive data before storing
Cipher cipher = Cipher.getInstance("AES/GCM/NoPadding");
cipher.init(Cipher.ENCRYPT_MODE, secretKey);
byte[] encrypted = cipher.doFinal(sensitiveData);

// Write encrypted data
FileOutputStream fos = openFileOutput("encrypted.dat", Context.MODE_PRIVATE);
fos.write(encrypted);
fos.close();
External Storage Mechanisms
Shared storage for multiple apps External storage includes emulated storage , apps need permissions , and scoped storage changed access model
Primary External Storage
Located at /sdcard/ Symlink to /storage/emulated/0/ , shared across apps , and provides large storage
# View external storage
adb shell ls /sdcard/

# Check actual path
adb shell ls -l /sdcard
App-Specific External
Private external directories At /sdcard/Android/data/package/ , no permission needed for own directory , deleted on uninstall , and larger than internal
# View app external storage
adb shell ls /sdcard/Android/data/com.example.app/
External Media Handling
Access photos videos and documents on shared storage MediaStore API provides structured access , scoped storage restricts direct file access , and apps need proper permissions for media files
MediaStore API
Query media collections without storage permission
// Query images
ContentResolver resolver = getContentResolver();
Uri collection = MediaStore.Images.Media.EXTERNAL_CONTENT_URI;

String[] projection = {
    MediaStore.Images.Media._ID,
    MediaStore.Images.Media.DISPLAY_NAME,
    MediaStore.Images.Media.SIZE
};

Cursor cursor = resolver.query(collection, projection, null, null, null);
while (cursor.moveToNext()) {
    long id = cursor.getLong(0);
    String name = cursor.getString(1);
    long size = cursor.getLong(2);

    Uri contentUri = ContentUris.withAppendedId(collection, id);
    // Use contentUri to access image
}
cursor.close();
Accessing Media Files
Open media through content URIs
// Open image for reading
Uri imageUri = ContentUris.withAppendedId(
    MediaStore.Images.Media.EXTERNAL_CONTENT_URI, imageId);

InputStream is = getContentResolver().openInputStream(imageUri);
Bitmap bitmap = BitmapFactory.decodeStream(is);
is.close();
Adding Media Files
Insert new media into MediaStore
// Add image to MediaStore
ContentValues values = new ContentValues();
values.put(MediaStore.Images.Media.DISPLAY_NAME, "photo.jpg");
values.put(MediaStore.Images.Media.MIME_TYPE, "image/jpeg");
values.put(MediaStore.Images.Media.RELATIVE_PATH, Environment.DIRECTORY_PICTURES);

Uri uri = getContentResolver().insert(
    MediaStore.Images.Media.EXTERNAL_CONTENT_URI, values);

// Write image data
OutputStream os = getContentResolver().openOutputStream(uri);
bitmap.compress(Bitmap.CompressFormat.JPEG, 90, os);
os.close();
# List media files
adb shell content query --uri content://media/external/images/media

# View specific media file
adb shell content query --uri content://media/external/images/media --where "_id=123"
Storage Access Framework
Let user pick files through system UI
// Open document picker
Intent intent = new Intent(Intent.ACTION_OPEN_DOCUMENT);
intent.setType("*/*");
intent.addCategory(Intent.CATEGORY_OPENABLE);
startActivityForResult(intent, REQUEST_CODE);

// Handle result
@Override
protected void onActivityResult(int requestCode, int resultCode, Intent data) {
    if (requestCode == REQUEST_CODE && resultCode == RESULT_OK) {
        Uri uri = data.getData();
        // Access file through URI
    }
}
File Permissions
Linux file permissions control access Every file has owner UID , permission bits for read write execute , and Android enforces strict permission model
Permission Bits
Standard Unix permissions apply
# View file permissions
adb shell ls -l /data/data/com.example.app/files/secret.txt
# Output: -rw------- 1 u0_a123 u0_a123 1024 Jan 01 12:00 secret.txt
# rw------- means owner can read/write, others have no access
Setting Permissions
Apps can set file permissions
// Create file with specific permissions
File file = new File(getFilesDir(), "private.dat");
file.createNewFile();

// Set readable only by owner
file.setReadable(false, false);  // Remove all read
file.setReadable(true, true);    // Owner can read

// Set writable only by owner
file.setWritable(false, false);
file.setWritable(true, true);
# Change file permissions
adb shell chmod 600 /data/data/com.example.app/files/secret.txt
# 600 = rw------- (owner read/write only)

# Change file owner (requires root)
adb shell chown u0_a123:u0_a123 /data/data/com.example.app/files/file.txt
World-Readable Files
Dangerous permission mode
// DON'T DO THIS - Security risk
FileOutputStream fos = openFileOutput("data.txt", Context.MODE_WORLD_READABLE);
// Any app can read this file

// CORRECT - Private by default
FileOutputStream fos = openFileOutput("data.txt", Context.MODE_PRIVATE);
// Only your app can access
SELinux Context
Files have SELinux labels
# View SELinux context
adb shell ls -Z /data/data/com.example.app/files/
# Output shows: u:object_r:app_data_file:s0:c123,c256,c512,c768

# SELinux enforces additional access control beyond Unix permissions
Cache Directories
Multiple cache types for performance Cache stores temporary data , system clears when storage low , and apps shouldn't store critical data
App Internal Cache
At /data/data/package/cache/ App-specific temporary storage , system can delete anytime , use getCacheDir() , and perfect for temp files
# View cache
adb shell ls /data/data/com.example.app/cache/

# Clear cache
adb shell pm clear com.example.app
App External Cache
At /sdcard/Android/data/package/cache/ Larger than internal , still deletable , use getExternalCacheDir() , and good for big temp files
App-Specific Storage
Dedicated storage locations App-specific directories don't need permissions , deleted on uninstall , and provide isolated storage
Internal App-Specific
At /data/data/package/ Completely private , no permissions needed , limited by internal storage , and best for sensitive data
External App-Specific
At /sdcard/Android/data/package/ Larger capacity , no permissions needed (Android 4.4+) , deleted on uninstall , and good for large files
Scoped Storage Android 10+
Fundamental storage access change Android 10 introduced scoped storage , apps only access own directories , must use SAF for user files , and MediaStore for media
What Changed
Direct file path access restricted Apps can't browse /sdcard/ freely , must request permission through SAF , MediaStore provides media access , and breaks many file managers
Storage Access Framework
User picks files through system picker App launches document picker intent , user selects file , app receives URI , and ensures explicit user consent
SQLite Databases
Embedded database engine SQLite provides full SQL database , used by most apps , stores structured data , and supports transactions
Database Location
Stored in /data/data/package/databases/ Each database is separate file , includes journal for transactions , and can be analyzed offline
# List databases
adb shell ls /data/data/com.example.app/databases/

# Dump database schema
adb shell sqlite3 /data/data/com.example.app/databases/main.db ".schema"

# Query data
adb shell sqlite3 /data/data/com.example.app/databases/main.db "SELECT * FROM table_name;"
Security Concerns
Databases often store sensitive data Passwords in plaintext , session tokens , user data , and accessible with root
Shared Preferences
Key-value storage for settings Shared Preferences provides XML-based storage , stores primitive types , commonly used for preferences , and often contains sensitive data
Storage Format
XML files with key-value pairs Each preference file is XML , values can be strings integers booleans , and file permissions restrict access
# View shared preferences
adb shell cat /data/data/com.example.app/shared_prefs/settings.xml
<?xml version='1.0' encoding='utf-8' standalone='yes' ?>
<map>
    <string name="username">user123</string>
    <boolean name="notifications" value="true" />
    <int name="theme" value="2" />
</map>
Security Issues
Preferences stored in plaintext Sensitive data like passwords shouldn't go here , file permissions provide only protection , and rooted devices can read any preferences
APK Structure
![]()
APK File Format
APK is just a ZIP archive Android Package contains all app components , uses standard ZIP compression , and can be extracted with unzip
# Extract APK contents
unzip app.apk -d extracted/

# List APK contents
unzip -l app.apk

# View APK structure
tree extracted/
APK Components
Standard APK structure includes: AndroidManifest.xml (binary XML) , classes.dex (compiled code) , resources.arsc (compiled resources) , res/ directory (resources) , assets/ directory (raw assets) , lib/ directory (native libraries) , META-INF/ directory (signatures)
AndroidManifest.xml Deep Dive
Critical configuration file Manifest declares app components , defines permissions , specifies requirements , and without it app won't run
Package Declaration
Unique app identifier
<manifest xmlns:android="http://schemas.android.com/apk/res/android"
    package="com.example.app"
    android:versionCode="1"
    android:versionName="1.0">
Package name must be globally unique , versionCode is integer for updates , versionName is human-readable , and package identifies app
Permission Declarations
Apps declare needed permissions
<uses-permission android:name="android.permission.INTERNET"/>
<uses-permission android:name="android.permission.CAMERA"/>
Each permission must be declared , dangerous permissions need runtime request , and users see permission list
Component Declarations
All components must be declared Activities services receivers providers , exported components accessible from other apps , and intent filters define capabilities
<activity android:name=".MainActivity"
    android:exported="true">
    <intent-filter>
        <action android:name="android.intent.action.MAIN"/>
        <category android:name="android.intent.category.LAUNCHER"/>
    </intent-filter>
</activity>
SDK Version
Minimum and target SDK versions
<uses-sdk
    android:minSdkVersion="21"
    android:targetSdkVersion="33"/>
minSdkVersion defines minimum Android version , targetSdkVersion indicates tested version , and affects behavior and permissions
DEX Files and Bytecode
Dalvik Executable format Java/Kotlin code compiles to DEX bytecode , optimized for mobile devices , and executed by ART runtime
DEX File Structure
classes.dex contains all app code Multiple DEX files if method count exceeds 65536 , named classes.dex classes2.dex etc , and contains compiled classes
# List DEX files in APK
unzip -l app.apk | grep "\.dex$"

# View DEX info
dexdump classes.dex | head -50

# Count methods in DEX
dexdump classes.dex | grep "method_ids_size"
Method Limit
Single DEX file limited to 65536 methods Includes app methods and library methods , exceeding limit requires multidex , and splits code across multiple DEX files
Resources and Assets
External app resources Resources in res/ directory , assets in assets/ directory , and resources compiled while assets stay raw
Resources Directory
Organized by type and configuration res/layout/ for UI layouts , res/drawable/ for images , res/values/ for strings colors dimensions , res/xml/ for XML configs , and qualifiers enable different resources for different configs
# View resources in APK
aapt dump resources app.apk

# List resource configurations
aapt dump configurations app.apk

# Extract specific resource
aapt dump strings app.apk
Assets Directory
Raw files bundled with app Not compiled , accessed by filename , good for data files , and loaded at runtime
Native Libraries in APK
Compiled C/C++ code Apps can include native libraries , architecture-specific binaries , and accessed through JNI
Library Organization
Separate directory per architecture lib/armeabi-v7a/ for 32-bit ARM , lib/arm64-v8a/ for 64-bit ARM , lib/x86/ for Intel 32-bit , lib/x86_64/ for Intel 64-bit , and Android loads appropriate library
# List native libraries
unzip -l app.apk | grep "lib/.*\.so$"

# Extract libraries
unzip app.apk "lib/*"

# Check library architecture
readelf -h lib/arm64-v8a/libnative.so
META-INF Signing
APK signature files META-INF/ contains signing information , MANIFEST.MF lists file hashes , CERT.SF contains signature , and CERT.RSA has certificate
Signature Files
MANIFEST.MF hashes all files CERT.SF signs the manifest , CERT.RSA contains public key certificate , and verifies APK integrity
# View signature files
unzip -l app.apk | grep META-INF

# Extract signature
unzip app.apk META-INF/*

# View certificate info
keytool -printcert -file META-INF/CERT.RSA
APK Decompilation
Reverse engineering APK files Decompilation converts APK back to readable code , useful for analysis , and multiple tools available
JADX
Decompiles DEX to Java
# Decompile with JADX
jadx app.apk -d output/

# Decompile with GUI
jadx-gui app.apk
Produces readable Java code , shows app logic , and enables static analysis
APKTool
Decompiles to Smali
# Decompile APK
apktool d app.apk

# Rebuild APK
apktool b app/ -o rebuilt.apk
Produces Smali code , preserves resources , and enables modification
Smali Code
Dalvik bytecode assembly language Smali is human-readable DEX bytecode , used for modifying apps , and lower-level than Java
Smali Syntax
Assembly-like language
.method public getMessage()Ljava/lang/String;
    .locals 1
    const-string v0, "Hello"
    return-object v0
.end method
Each DEX instruction has Smali equivalent , registers instead of variables , and type descriptors for objects
Modifying Apps
Decompile to Smali , edit code , rebuild APK , and sign
# Decompile
apktool d app.apk

# Edit smali files
nano app/smali/com/example/MainActivity.smali

# Rebuild
apktool b app/ -o modified.apk

# Sign
jarsigner -keystore my.keystore modified.apk alias
Application Components
Activities and Lifecycle
Activities represent UI screens Each activity is single screen , has lifecycle callbacks , and manages UI state
Activity Lifecycle
Activities go through lifecycle states onCreate() initializes activity , onStart() makes visible , onResume() brings to foreground , onPause() loses focus , onStop() no longer visible , onDestroy() cleans up , and system calls these automatically
@Override
protected void onCreate(Bundle savedInstanceState) {
    super.onCreate(savedInstanceState);
    setContentView(R.layout.activity_main);
}

@Override
protected void onResume() {
    super.onResume();
    // Activity in foreground
}
Lifecycle Monitoring
Track activity lifecycle with ADB
# Monitor activity lifecycle
adb shell dumpsys activity activities

# Get current activity
adb shell dumpsys window | grep mCurrentFocus

# View activity stack
adb shell dumpsys activity activities | grep "Run #"
Services Background Work
Services run in background No user interface , performs long-running operations , and continues when app closed
Service Types
Started services run until stopped Bound services provide client-server interface , foreground services show notification , and background services restricted on newer Android
# List running services
adb shell dumpsys activity services

# Start service via ADB
adb shell am startservice -n com.example.app/.MyService

# Stop service
adb shell am stopservice -n com.example.app/.MyService
Service Lifecycle
onCreate() initializes service , onStartCommand() handles start requests , onBind() for bound services , onDestroy() cleans up , and system manages lifecycle
Broadcast Receivers
Respond to system-wide events Receivers listen for broadcasts , can be registered in manifest or code , and handle events like boot completed or battery low
Static Receivers
Declared in manifest
<receiver android:name=".MyReceiver"
    android:exported="true">
    <intent-filter>
        <action android:name="android.intent.action.BOOT_COMPLETED"/>
    </intent-filter>
</receiver>
Registered at install time , survive app closure , and respond to system events
Dynamic Receivers
Registered in code
IntentFilter filter = new IntentFilter("com.example.ACTION");
registerReceiver(myReceiver, filter);
Only active while app running , can be unregistered , and more flexible
Testing Receivers
Send broadcasts via ADB
# Send broadcast
adb shell am broadcast -a com.example.ACTION

# Send with extras
adb shell am broadcast -a com.example.ACTION --es key "value"

# Send system broadcast
adb shell am broadcast -a android.intent.action.BOOT_COMPLETED
Content Providers
Manage access to structured data Providers share data between apps , use URI-based access , and support CRUD operations
Provider URIs
Content URIs identify data
content://com.example.provider/table/id
Scheme is content:// , authority identifies provider , path specifies data , and ID selects specific item
Querying Providers
Access data via content resolver
# Query content provider
adb shell content query --uri content://com.example.provider/table

# Insert data
adb shell content insert --uri content://com.example.provider/table --bind name:s:value

# Delete data
adb shell content delete --uri content://com.example.provider/table/1
Intents Explicit vs Implicit
Intents are messaging objects Enable component communication , carry data between components , and can be explicit or implicit
Explicit Intents
Specify exact component
Intent intent = new Intent(this, TargetActivity.class);
startActivity(intent);
Names specific class , used within app , and guaranteed delivery
Implicit Intents
Describe action to perform
Intent intent = new Intent(Intent.ACTION_VIEW);
intent.setData(Uri.parse("https://example.com"));
startActivity(intent);
System resolves to appropriate component , can match multiple apps , and user may choose
Testing Intents
Launch activities via ADB
# Start activity (explicit)
adb shell am start -n com.example.app/.MainActivity

# Start with action (implicit)
adb shell am start -a android.intent.action.VIEW -d https://example.com

# Start with extras
adb shell am start -n com.example.app/.MainActivity --es key "value"
Intent Filters
Declare component capabilities Filters specify which intents component can handle , defined in manifest , and enable implicit intent resolution
Filter Components
Action specifies operation Category provides additional info , Data defines URI and MIME type , and all must match for intent to resolve
<intent-filter>
    <action android:name="android.intent.action.VIEW"/>
    <category android:name="android.intent.category.DEFAULT"/>
    <data android:scheme="https"/>
</intent-filter>
Deep Links
URLs that open app content Deep links enable web-to-app navigation , can be http:// or custom scheme , and open specific app screens
App Links
Verified deep links
<intent-filter android:autoVerify="true">
    <action android:name="android.intent.action.VIEW"/>
    <category android:name="android.intent.category.DEFAULT"/>
    <category android:name="android.intent.category.BROWSABLE"/>
    <data android:scheme="https"
          android:host="example.com"/>
</intent-filter>
Requires domain verification , opens app without chooser , and provides seamless experience
Testing Deep Links
Trigger deep links via ADB
# Open deep link
adb shell am start -a android.intent.action.VIEW -d "https://example.com/path"

# Open custom scheme
adb shell am start -a android.intent.action.VIEW -d "myapp://path"
Pending Intents
Intent with permission to execute later Pending intents grant other apps permission to execute intent , used for notifications and widgets , and maintain app's permissions
Creating Pending Intents
Wrap regular intent
Intent intent = new Intent(this, MainActivity.class);
PendingIntent pendingIntent = PendingIntent.getActivity(
    this, 0, intent, PendingIntent.FLAG_IMMUTABLE);
Other app can execute with your permissions , commonly used in notifications , and must specify mutability flag
Fragments
Modular UI components within activities Fragments represent reusable portions of UI , have own lifecycle tied to host activity , enable flexible layouts for different screen sizes , and allow dynamic UI composition at runtime
Fragment Lifecycle
Fragments have complex lifecycle
public class MyFragment extends Fragment {
    @Override
    public void onCreate(Bundle savedInstanceState) {
        super.onCreate(savedInstanceState);
        // Initialize fragment
    }

    @Override
    public View onCreateView(LayoutInflater inflater, ViewGroup container,
                             Bundle savedInstanceState) {
        // Inflate fragment layout
        return inflater.inflate(R.layout.fragment_my, container, false);
    }

    @Override
    public void onViewCreated(View view, Bundle savedInstanceState) {
        super.onViewCreated(view, savedInstanceState);
        // Setup UI components
    }

    @Override
    public void onDestroyView() {
        super.onDestroyView();
        // Clean up view references
    }
}
Fragment Transactions
Add replace or remove fragments dynamically
// Add fragment
getSupportFragmentManager().beginTransaction()
    .add(R.id.fragment_container, new MyFragment())
    .commit();

// Replace fragment with back stack
getSupportFragmentManager().beginTransaction()
    .replace(R.id.fragment_container, new OtherFragment())
    .addToBackStack(null)
    .commit();

// Remove fragment
getSupportFragmentManager().beginTransaction()
    .remove(fragment)
    .commit();
Communication Between Fragments
Use ViewModel or interfaces
// Shared ViewModel approach
public class SharedViewModel extends ViewModel {
    private MutableLiveData<String> selected = new MutableLiveData<>();

    public void select(String item) {
        selected.setValue(item);
    }

    public LiveData<String> getSelected() {
        return selected;
    }
}

// In fragments
SharedViewModel model = new ViewModelProvider(requireActivity())
    .get(SharedViewModel.class);
model.getSelected().observe(getViewLifecycleOwner(), item -> {
    // Update UI
});
ViewModels
Store UI-related data that survives configuration changes ViewModels separate UI logic from UI controllers , survive screen rotations , provide data to multiple fragments , and integrate with LiveData for reactive updates
Basic ViewModel
Extend ViewModel class
public class MyViewModel extends ViewModel {
    private MutableLiveData<List<User>> users;

    public LiveData<List<User>> getUsers() {
        if (users == null) {
            users = new MutableLiveData<>();
            loadUsers();
        }
        return users;
    }

    private void loadUsers() {
        // Load data from repository
        users.setValue(repository.getUsers());
    }

    @Override
    protected void onCleared() {
        // Cleanup when ViewModel destroyed
    }
}
Using ViewModel in Activity
Get ViewModel instance
public class MainActivity extends AppCompatActivity {
    private MyViewModel viewModel;

    @Override
    protected void onCreate(Bundle savedInstanceState) {
        super.onCreate(savedInstanceState);
        setContentView(R.layout.activity_main);

        // Get ViewModel
        viewModel = new ViewModelProvider(this).get(MyViewModel.class);

        // Observe data
        viewModel.getUsers().observe(this, users -> {
            // Update UI with users list
            adapter.setUsers(users);
        });
    }
}
ViewModel Scope
ViewModels scoped to lifecycle Activity-scoped ViewModel shared across fragments , Fragment-scoped ViewModel private to fragment , and ViewModel survives configuration changes but destroyed when activity finishes
LiveData
Observable data holder for lifecycle-aware components LiveData respects activity/fragment lifecycle , automatically updates UI when data changes , prevents memory leaks , and only notifies active observers
Creating LiveData
Wrap data in LiveData
public class UserRepository {
    private MutableLiveData<User> currentUser = new MutableLiveData<>();

    public LiveData<User> getCurrentUser() {
        return currentUser;
    }

    public void loadUser(String userId) {
        // Fetch from network or database
        User user = api.getUser(userId);
        currentUser.setValue(user);  // Update on main thread
        // Or use postValue() from background thread
    }
}
Observing LiveData
Register observer in activity or fragment
viewModel.getUser().observe(this, user -> {
    // Update UI when user data changes
    if (user != null) {
        nameTextView.setText(user.getName());
        emailTextView.setText(user.getEmail());
    }
});
Transformations
Transform LiveData values
// Map transformation
LiveData<String> userName = Transformations.map(userLiveData, user -> {
    return user.getFirstName() + " " + user.getLastName();
});

// SwitchMap for chained LiveData
LiveData<User> user = Transformations.switchMap(userIdLiveData, id -> {
    return repository.getUserById(id);
});
MediatorLiveData
Combine multiple LiveData sources
MediatorLiveData<Result> mediator = new MediatorLiveData<>();
mediator.addSource(source1, value -> {
    mediator.setValue(combineResults(value, source2.getValue()));
});
mediator.addSource(source2, value -> {
    mediator.setValue(combineResults(source1.getValue(), value));
});
App Widgets
Home screen widgets for quick information Widgets run in separate process , update through RemoteViews , use AppWidgetProvider , and provide glanceable information without opening app
Widget Provider
Extend AppWidgetProvider
public class MyWidget extends AppWidgetProvider {
    @Override
    public void onUpdate(Context context, AppWidgetManager appWidgetManager,
                        int[] appWidgetIds) {
        for (int appWidgetId : appWidgetIds) {
            // Create RemoteViews
            RemoteViews views = new RemoteViews(
                context.getPackageName(), R.layout.widget_layout);

            // Update widget content
            views.setTextViewText(R.id.widget_text, "Hello Widget");

            // Setup click handler
            Intent intent = new Intent(context, MainActivity.class);
            PendingIntent pendingIntent = PendingIntent.getActivity(
                context, 0, intent, PendingIntent.FLAG_IMMUTABLE);
            views.setOnClickPendingIntent(R.id.widget_button, pendingIntent);

            // Update widget
            appWidgetManager.updateAppWidget(appWidgetId, views);
        }
    }

    @Override
    public void onDeleted(Context context, int[] appWidgetIds) {
        // Widget removed from home screen
    }

    @Override
    public void onEnabled(Context context) {
        // First widget instance created
    }

    @Override
    public void onDisabled(Context context) {
        // Last widget instance removed
    }
}
Widget Metadata
Define widget configuration in XML
<!-- res/xml/widget_info.xml -->
<appwidget-provider
    xmlns:android="http://schemas.android.com/apk/res/android"
    android:minWidth="250dp"
    android:minHeight="110dp"
    android:updatePeriodMillis="1800000"
    android:initialLayout="@layout/widget_layout"
    android:resizeMode="horizontal|vertical"
    android:widgetCategory="home_screen">
</appwidget-provider>
Manifest Declaration
Register widget in AndroidManifest
<receiver android:name=".MyWidget"
    android:exported="true">
    <intent-filter>
        <action android:name="android.appwidget.action.APPWIDGET_UPDATE" />
    </intent-filter>
    <meta-data
        android:name="android.appwidget.provider"
        android:resource="@xml/widget_info" />
</receiver>
Updating Widgets
Manually trigger widget updates
// Update all widget instances
Intent intent = new Intent(context, MyWidget.class);
intent.setAction(AppWidgetManager.ACTION_APPWIDGET_UPDATE);
int[] ids = AppWidgetManager.getInstance(context)
    .getAppWidgetIds(new ComponentName(context, MyWidget.class));
intent.putExtra(AppWidgetManager.EXTRA_APPWIDGET_IDS, ids);
context.sendBroadcast(intent);
# List installed widgets
adb shell dumpsys appwidget

# Force widget update
adb shell am broadcast -a android.appwidget.action.APPWIDGET_UPDATE
Permission System
Permission Types Overview
Android uses multiple permission types Normal permissions granted automatically , dangerous permissions need user approval , signature permissions for system apps , and special permissions require settings
Permission Protection Levels
Normal for low-risk features Dangerous for privacy-sensitive data , signature for same-certificate apps , and signatureOrSystem for system apps
Normal vs Dangerous Permissions
Normal permissions low-risk Granted at install time , don't access sensitive data , examples include INTERNET VIBRATE , and user doesn't see prompt
Dangerous Permissions
Access sensitive user data Require runtime request , user sees dialog , examples include CAMERA LOCATION CONTACTS , and can be revoked anytime
// Request dangerous permission
if (ContextCompat.checkSelfPermission(this, Manifest.permission.CAMERA)
        != PackageManager.PERMISSION_GRANTED) {
    ActivityCompat.requestPermissions(this,
        new String[]{Manifest.permission.CAMERA}, REQUEST_CODE);
}
Runtime Permissions Model
Android 6.0+ requires runtime requests Apps request permissions when needed , user sees dialog with allow/deny , and permissions can be revoked in settings
Checking Permissions
Verify permission before use
# Check app permissions
adb shell dumpsys package com.example.app | grep permission

# Grant permission via ADB
adb shell pm grant com.example.app android.permission.CAMERA

# Revoke permission
adb shell pm revoke com.example.app android.permission.CAMERA
Custom Permissions
Apps can define own permissions Protect app components , control access to data , and enforce security boundaries
Defining Custom Permission
Declare in manifest
<permission
    android:name="com.example.app.CUSTOM_PERMISSION"
    android:protectionLevel="signature"/>
Other apps must request to use , protection level controls access , and enables fine-grained control
Permission Groups
Related permissions grouped together User sees group name in prompts , granting one grants all in group , examples include CAMERA LOCATION STORAGE , and simplifies user experience
Signature Permissions
Only for same-certificate apps Apps must be signed with same key , automatically granted if signatures match , and used for privileged operations
Permission Delegation
Apps can delegate permissions Content providers can grant URI permissions , temporary access to specific data , and revoked when done
Android Debug Bridge
ADB Installation and Setup
ADB is command-line tool for device communication Included in Android SDK Platform Tools , enables debugging and testing , and essential for development
Installing ADB
Download Platform Tools
# Linux: Install via package manager
sudo apt install adb

# Or download from Google
wget https://dl.google.com/android/repository/platform-tools-latest-linux.zip
unzip platform-tools-latest-linux.zip
export PATH=$PATH:$(pwd)/platform-tools

# Verify installation
adb version
Device Connection Methods
Connect via USB or network USB requires drivers and debugging enabled , network connection needs same WiFi , and both have uses
USB Connection
Enable USB debugging on device Settings > Developer Options > USB Debugging , connect via USB cable , authorize computer on device , and verify connection
# List connected devices
adb devices

# Output:
# List of devices attached
# ABC123456  device
Network Connection
Connect over WiFi
# Connect device via USB first
adb tcpip 5555

# Disconnect USB and connect via IP
adb connect 192.168.1.100:5555

# Verify connection
adb devices
File Operations Push Pull
Transfer files between computer and device Push sends files to device , pull retrieves from device , and both preserve permissions
Push Files
Send files to device
# Push file to device
adb push local_file.txt /sdcard/

# Push directory
adb push local_dir/ /sdcard/remote_dir/

# Push to app directory (requires root)
adb push file.db /data/data/com.example.app/databases/
Pull Files
Retrieve files from device
# Pull file from device
adb pull /sdcard/file.txt

# Pull directory
adb pull /sdcard/DCIM/ ./photos/

# Pull app database
adb pull /data/data/com.example.app/databases/main.db
Package Management Commands
Install remove and manage apps PM commands handle package operations , query installed apps , and manage permissions
Installing Apps
Install APK files
# Install APK
adb install app.apk

# Install with replace
adb install -r app.apk

# Install to specific location
adb install -s app.apk  # SD card
Managing Packages
List and query packages
# List all packages
adb shell pm list packages

# List user-installed apps
adb shell pm list packages -3

# List system apps
adb shell pm list packages -s

# Get package path
adb shell pm path com.example.app

# Uninstall app
adb shell pm uninstall com.example.app

# Clear app data
adb shell pm clear com.example.app
Logcat and Debugging
View system and app logs Logcat displays log messages , filter by tag or priority , and essential for debugging
Basic Logcat
View all logs
# View all logs
adb logcat

# Clear log buffer
adb logcat -c

# View and follow
adb logcat -v time
Filtering Logs
Filter by tag or priority
# Filter by tag
adb logcat -s TAG_NAME

# Filter by priority (V D I W E F)
adb logcat *:E  # Errors only

# Filter by package
adb logcat --pid=$(adb shell pidof com.example.app)

# Grep for specific text
adb logcat | grep "search term"
Shell Access and Commands
Execute commands on device ADB shell provides command-line access , run Linux commands , and interact with Android
Basic Shell
Access device shell
# Open interactive shell
adb shell

# Run single command
adb shell ls /sdcard/

# Run as root (requires root)
adb root
adb shell
Common Shell Commands
Navigate and inspect device
# List files
adb shell ls -la /data/data/

# View file contents
adb shell cat /proc/cpuinfo

# Check running processes
adb shell ps -A

# Monitor system resources
adb shell top

# Check disk usage
adb shell df -h
Activity Manager Commands
Control activities and services AM commands start activities , send broadcasts , and manage components
Starting Activities
Launch app components
# Start main activity
adb shell am start -n com.example.app/.MainActivity

# Start with action
adb shell am start -a android.intent.action.VIEW

# Start with data
adb shell am start -d "https://example.com"

# Start with extras
adb shell am start -n com.example.app/.MainActivity --es key "value" --ei number 123
Managing Services
Start and stop services
# Start service
adb shell am startservice -n com.example.app/.MyService

# Stop service
adb shell am stopservice -n com.example.app/.MyService

# Send broadcast
adb shell am broadcast -a com.example.ACTION
Dumpsys Usage
Dump system service state Dumpsys provides detailed system information , query specific services , and debug issues
Common Dumpsys Commands
Query system services
# List all services
adb shell dumpsys -l

# Dump activity manager
adb shell dumpsys activity

# Dump package info
adb shell dumpsys package com.example.app

# Dump battery stats
adb shell dumpsys battery

# Dump memory info
adb shell dumpsys meminfo

# Dump window manager
adb shell dumpsys window
ADB over Network
Connect to device wirelessly without USB ADB supports TCP/IP connections , useful for devices without USB , enables remote debugging , and works over WiFi or ethernet
Enable ADB over TCP/IP
Start ADB daemon on network port
# Connect device via USB first
adb devices

# Enable TCP/IP mode on port 5555
adb tcpip 5555

# Find device IP address
adb shell ip addr show wlan0 | grep inet

# Disconnect USB cable

# Connect over network
adb connect 192.168.1.100:5555

# Verify connection
adb devices
# Output: 192.168.1.100:5555 device

# Use ADB normally
adb shell
adb logcat
adb install app.apk
Disconnect Network ADB
Return to USB mode
# Disconnect from network device
adb disconnect 192.168.1.100:5555

# Or disconnect all
adb disconnect

# Switch back to USB mode
adb usb
Security Considerations
Network ADB has security risks Anyone on same network can connect , no authentication by default , attacker can install apps or extract data , and should only use on trusted networks
# Check if ADB over network is enabled
adb shell getprop service.adb.tcp.port
# Returns 5555 if enabled, -1 if disabled

# Disable ADB over network (requires USB connection)
adb usb
Persistent Network ADB
Enable on boot with root
# Requires root access
adb shell su -c "setprop service.adb.tcp.port 5555"
adb shell su -c "stop adbd"
adb shell su -c "start adbd"

# Make persistent across reboots
adb shell su -c "echo 'service.adb.tcp.port=5555' >> /system/build.prop"
Wireless Debugging Android 11+
Pair devices without USB
# On device: Settings > Developer Options > Wireless Debugging
# Enable and tap "Pair device with pairing code"
# Note the IP address, port, and pairing code

# On computer: Pair using code
adb pair 192.168.1.100:37891
# Enter pairing code when prompted

# Connect to device
adb connect 192.168.1.100:37893

# Verify
adb devices
ADB Backup and Restore
Backup app data without root ADB backup creates archive of app data , includes databases and files , doesn't require root , and useful for data migration or forensics
Create Backup
Backup specific app or all apps
# Backup single app
adb backup -f backup.ab com.example.app

# Backup with APK included
adb backup -f backup.ab -apk com.example.app

# Backup all apps
adb backup -f full_backup.ab -all

# Backup system apps too
adb backup -f system_backup.ab -all -system

# Backup without compression
adb backup -f backup.ab -noapk -nosystem com.example.app

# Backup shared storage
adb backup -f backup.ab -shared
Restore Backup
Restore from backup archive
# Restore backup
adb restore backup.ab

# Device will prompt for confirmation
# User must approve restore on device screen
Backup File Format
AB files are compressed tar archives
# Extract backup file (requires Android Backup Extractor)
java -jar abe.jar unpack backup.ab backup.tar

# Extract tar
tar -xvf backup.tar

# View contents
ls -la apps/com.example.app/

# Repack modified backup
tar -cvf backup.tar apps/
java -jar abe.jar pack backup.tar backup_modified.ab
Limitations
Not all apps support backup Apps can disable backup with android:allowBackup="false" , some apps exclude sensitive data , encrypted backups require device password , and backup doesn't include app code (unless -apk flag used)
# Check if app allows backup
adb shell dumpsys package com.example.app | grep allowBackup
# allowBackup=true means backup is allowed
Forensic Use
Extract app data for analysis
# Backup app data
adb backup -f evidence.ab -noapk com.target.app

# Extract to examine databases
java -jar abe.jar unpack evidence.ab evidence.tar
tar -xvf evidence.tar

# Analyze SQLite databases
sqlite3 apps/com.target.app/db/database.db
.tables
SELECT * FROM users;

# Examine shared preferences
cat apps/com.target.app/sp/prefs.xml
Alternative: Pull Data Directory
Direct file access with root
# Requires root
adb shell su -c "cp -r /data/data/com.example.app /sdcard/"
adb pull /sdcard/com.example.app ./

# Or use run-as for debuggable apps
adb shell run-as com.example.app
cp -r /data/data/com.example.app /sdcard/
exit
adb pull /sdcard/com.example.app ./
Build and Development
Gradle Build System
Gradle builds Android apps Build automation tool , manages dependencies , configures build variants , and generates APK/AAB
Build Configuration
build.gradle defines build
android {
    compileSdk 33

    defaultConfig {
        applicationId "com.example.app"
        minSdk 21
        targetSdk 33
        versionCode 1
        versionName "1.0"
    }

    buildTypes {
        release {
            minifyEnabled true
            proguardFiles getDefaultProguardFile('proguard-android.txt')
        }
    }
}
APK Signing Process
APKs must be signed to install Signing proves app authenticity , prevents tampering , and required for distribution
Generating Keystore
Create signing key
# Generate keystore
keytool -genkey -v -keystore my-release-key.keystore \
    -alias my-key-alias -keyalg RSA -keysize 2048 -validity 10000

# Sign APK
jarsigner -verbose -sigalg SHA256withRSA -digestalg SHA-256 \
    -keystore my-release-key.keystore app.apk my-key-alias

# Verify signature
jarsigner -verify -verbose app.apk
APK Signature Scheme
V1 JAR signing (legacy) V2 APK Signature Scheme (Android 7.0+) , V3 adds key rotation (Android 9.0+) , and V4 streaming verification (Android 11+)
ProGuard and R8 Obfuscation
Code shrinking and obfuscation Removes unused code , obfuscates class and method names , and reduces APK size
R8 Configuration
Modern code shrinker
buildTypes {
    release {
        minifyEnabled true
        shrinkResources true
        proguardFiles getDefaultProguardFile('proguard-android-optimize.txt'),
                      'proguard-rules.pro'
    }
}
Shrinks code and resources , obfuscates names , optimizes bytecode , and enabled in release builds
Build Variants and Flavors
Multiple app versions from same codebase Build types define debug/release , product flavors create variants , and combinations generate different APKs
Product Flavors
Different app versions
flavorDimensions "version"
productFlavors {
    free {
        dimension "version"
        applicationIdSuffix ".free"
    }
    paid {
        dimension "version"
        applicationIdSuffix ".paid"
    }
}
Creates multiple APKs , different package names , and separate configurations
Android App Bundles AAB
Modern app distribution format AAB replaces APK for Play Store , Google generates optimized APKs , and reduces download size
Building AAB
Generate app bundle
# Build AAB with Gradle
./gradlew bundleRelease

# Output: app/build/outputs/bundle/release/app-release.aab
Smaller downloads , dynamic delivery , and required for new Play Store apps
Reverse Engineering Tools
Tools for APK analysis JADX decompiles to Java , APKTool produces Smali , and various tools for different purposes
Common Tools
JADX for Java decompilation
jadx app.apk -d output/
jadx-gui app.apk
APKTool for Smali
apktool d app.apk
apktool b app/ -o rebuilt.apk
dex2jar for JAR conversion
d2j-dex2jar classes.dex
jd-gui classes-dex2jar.jar
Network Security
Network Security Configuration
XML-based network security policy Defines trusted CAs , enables cleartext , configures certificate pinning , and enforces TLS requirements
NSC File
res/xml/network_security_config.xml
<?xml version="1.0" encoding="utf-8"?>
<network-security-config>
    <base-config cleartextTrafficPermitted="false">
        <trust-anchors>
            <certificates src="system"/>
        </trust-anchors>
    </base-config>
</network-security-config>
Reference in manifest
<application
    android:networkSecurityConfig="@xml/network_security_config">
Certificate Pinning
Restrict trusted certificates Pin specific certificates or public keys , prevents MITM attacks , and validates server identity
Implementing Pinning
Pin certificates in NSC
<domain-config>
    <domain includeSubdomains="true">example.com</domain>
    <pin-set expiration="2025-01-01">
        <pin digest="SHA-256">base64encodedpin==</pin>
    </pin-set>
</domain-config>
Pins specific certificate , fails if mismatch , and requires careful management
Cleartext Traffic Handling
HTTP traffic restrictions Android 9+ blocks cleartext by default , must explicitly allow , and encourages HTTPS
Allowing Cleartext
Enable for specific domains
<domain-config cleartextTrafficPermitted="true">
    <domain includeSubdomains="true">example.com</domain>
</domain-config>
Or allow all (not recommended)
<base-config cleartextTrafficPermitted="true"/>
TLS Configuration
Configure TLS versions and cipher suites for secure communications Android's Network Security Configuration allows fine-grained control over TLS settings , you can specify minimum TLS version to prevent downgrade attacks , restrict cipher suites to only strong algorithms , and enforce perfect forward secrecy to protect past sessions even if long-term keys are compromised
TLS Version Requirements
Specify minimum TLS version in NSC
<network-security-config>
    <base-config>
        <trust-anchors>
            <certificates src="system"/>
        </trust-anchors>
    </base-config>
    <domain-config>
        <domain includeSubdomains="true">secure.example.com</domain>
        <trust-anchors>
            <certificates src="@raw/my_ca"/>
        </trust-anchors>
    </domain-config>
</network-security-config>
Android enforces TLS 1.2 minimum by default on API 20+ TLS 1.0 and 1.1 deprecated due to known vulnerabilities , TLS 1.3 supported on Android 10+ with improved performance and security , and older protocols should never be enabled even for legacy server compatibility
Cipher Suite Selection
System chooses secure cipher suites automatically Modern Android versions prefer AEAD ciphers like AES-GCM , disable weak ciphers like RC4 and 3DES , enforce forward secrecy with ECDHE key exchange , and prioritize ChaCha20-Poly1305 on devices without AES hardware acceleration
# Check supported TLS versions
adb shell getprop | grep tls

# View SSL/TLS implementation
adb shell getprop | grep ssl

# Check BoringSSL version (Google's SSL library)
adb shell getprop ro.build.version.security_patch
Certificate Validation
Proper certificate chain validation is critical System verifies certificate chain up to trusted root CA , checks certificate hasn't expired , validates hostname matches certificate CN or SAN , verifies certificate hasn't been revoked through CRL or OCSP , and rejects self-signed certificates unless explicitly trusted in NSC
Custom Trust Anchors
Add custom CA certificates for enterprise or testing
<network-security-config>
    <domain-config>
        <domain includeSubdomains="true">internal.company.com</domain>
        <trust-anchors>
            <certificates src="@raw/company_ca"/>
            <certificates src="system"/>
        </trust-anchors>
    </domain-config>
</network-security-config>
Place CA certificate in res/raw/company_ca.pem , system trusts this CA only for specified domains , and this enables corporate MITM proxies without compromising security for other domains
Debug vs Release Configurations
Different trust settings for debug builds
<network-security-config>
    <debug-overrides>
        <trust-anchors>
            <certificates src="user"/>  <!-- Trust user-installed CAs in debug -->
        </trust-anchors>
    </debug-overrides>
    <base-config cleartextTrafficPermitted="false">
        <trust-anchors>
            <certificates src="system"/>  <!-- Only system CAs in release -->
        </trust-anchors>
    </base-config>
</network-security-config>
Debug builds can trust user-installed certificates for testing with Burp , release builds ignore user CAs preventing MITM attacks , and this balances security testing needs with production security
Hostname Verification
Ensure hostname matches certificate
// Hostname verification happens automatically with HttpsURLConnection
URL url = new URL("https://example.com");
HttpsURLConnection conn = (HttpsURLConnection) url.openConnection();
// System verifies hostname matches certificate

// Custom hostname verifier (dangerous - avoid in production)
conn.setHostnameVerifier(new HostnameVerifier() {
    public boolean verify(String hostname, SSLSession session) {
        // Custom verification logic
        return HttpsURLConnection.getDefaultHostnameVerifier()
            .verify(hostname, session);
    }
});
Testing TLS Configuration
Verify TLS settings with SSL Labs or testssl.sh
# Test server TLS configuration
testssl.sh https://example.com

# Check supported protocols
openssl s_client -connect example.com:443 -tls1_2

# View certificate chain
openssl s_client -connect example.com:443 -showcerts
Common TLS Vulnerabilities
Accepting all certificates defeats TLS security Never implement custom TrustManager that accepts everything , don't disable hostname verification , avoid allowing SSLv3 or TLS 1.0 , and never ignore certificate validation errors in production code
// DANGEROUS - Never do this in production
TrustManager[] trustAllCerts = new TrustManager[] {
    new X509TrustManager() {
        public void checkClientTrusted(X509Certificate[] chain, String authType) {}
        public void checkServerTrusted(X509Certificate[] chain, String authType) {}
        public X509Certificate[] getAcceptedIssuers() { return new X509Certificate[0]; }
    }
};
// This code bypasses all certificate validation - major security hole
Perfect Forward Secrecy
Ephemeral key exchange protects past sessions ECDHE (Elliptic Curve Diffie-Hellman Ephemeral) generates new keys for each session , even if server's private key compromised attacker can't decrypt past traffic , modern Android enforces PFS by preferring ECDHE cipher suites , and this is why you should never use static RSA key exchange
OCSP Stapling
Efficient certificate revocation checking Server includes OCSP response in TLS handshake , client verifies certificate status without separate OCSP query , reduces latency and privacy concerns , and Android supports OCSP stapling on modern versions
Proxy Detection and Bypass
Apps can detect proxy usage through multiple methods Security-conscious apps check system proxy settings , detect Burp or mitmproxy through various fingerprinting techniques , implement certificate pinning to prevent MITM , and may refuse to function when proxy detected to prevent traffic analysis during penetration testing
System Proxy Detection
Check Android's global proxy settings
// Method 1: Check system properties
String proxyHost = System.getProperty("http.proxyHost");
String proxyPort = System.getProperty("http.proxyPort");
if (proxyHost != null && !proxyHost.isEmpty()) {
    Log.w("Security", "HTTP proxy detected: " + proxyHost + ":" + proxyPort);
    // App may refuse to continue
}

// Method 2: Check WiFi proxy configuration
ConnectivityManager cm = (ConnectivityManager) getSystemService(Context.CONNECTIVITY_SERVICE);
Network network = cm.getActiveNetwork();
LinkProperties linkProperties = cm.getLinkProperties(network);
ProxyInfo proxyInfo = linkProperties.getHttpProxy();
if (proxyInfo != null) {
    String host = proxyInfo.getHost();
    int port = proxyInfo.getPort();
    Log.w("Security", "WiFi proxy detected: " + host + ":" + port);
}
Certificate Validation Detection
Apps detect custom CA certificates
// Check if user has installed custom CA certificates
try {
    TrustManagerFactory tmf = TrustManagerFactory.getInstance(
        TrustManagerFactory.getDefaultAlgorithm());
    tmf.init((KeyStore) null);

    X509TrustManager defaultTrustManager =
        (X509TrustManager) tmf.getTrustManagers()[0];

    // Count trusted CAs
    int systemCAs = defaultTrustManager.getAcceptedIssuers().length;

    // If count is unusual, user may have added custom CAs
    if (systemCAs > 150) {  // Typical Android has ~130-140 system CAs
        Log.w("Security", "Unusual number of trusted CAs detected");
    }
} catch (Exception e) {
    e.printStackTrace();
}
Bypassing Proxy Detection
Use Frida to hook detection methods
// Frida script to bypass proxy detection
Java.perform(function() {
    // Hook System.getProperty
    var System = Java.use("java.lang.System");
    System.getProperty.overload("java.lang.String").implementation = function(key) {
        if (key === "http.proxyHost" || key === "http.proxyPort") {
            console.log("Blocked proxy detection: " + key);
            return null;  // Return null to hide proxy
        }
        return this.getProperty(key);
    };

    // Hook ProxyInfo.getHost
    var ProxyInfo = Java.use("android.net.ProxyInfo");
    ProxyInfo.getHost.implementation = function() {
        console.log("Blocked ProxyInfo.getHost()");
        return null;
    };
});
VPN-Based Interception
Use VPN to intercept traffic without system proxy
# Set up transparent proxy with VPN
# App can't detect system proxy because there isn't one
# Traffic routes through VPN which redirects to Burp

# Example with ProxyDroid or similar tools
# This bypasses most proxy detection methods
SSL Pinning Detection
Apps verify server certificate fingerprint
// Certificate pinning implementation
CertificatePinner certificatePinner = new CertificatePinner.Builder()
    .add("api.example.com", "sha256/AAAAAAAAAAAAAAAAAAAAAAAAAAAAAAAAAAAAAAAAAAA=")
    .build();

OkHttpClient client = new OkHttpClient.Builder()
    .certificatePinner(certificatePinner)
    .build();

// This will fail if Burp's certificate is used
Bypassing Certificate Pinning
Multiple techniques to bypass pinning
# Method 1: Frida with objection
objection --gadget com.example.app explore
android sslpinning disable

# Method 2: Frida script
frida -U -f com.example.app -l ssl-pinning-bypass.js --no-pause

# Method 3: Xposed module (requires root)
# Install JustTrustMe or SSLUnpinning module

# Method 4: Patch APK
# Decompile with apktool
apktool d app.apk
# Modify network security config to trust user CAs
# Rebuild and sign
apktool b app/ -o patched.apk
Frida SSL Pinning Bypass Script
Universal SSL pinning bypass
Java.perform(function() {
    // Hook OkHttp CertificatePinner
    var CertificatePinner = Java.use("okhttp3.CertificatePinner");
    CertificatePinner.check.overload("java.lang.String", "java.util.List").implementation = function() {
        console.log("OkHttp pinning bypassed for: " + arguments[0]);
    };

    // Hook TrustManagerImpl
    var TrustManagerImpl = Java.use("com.android.org.conscrypt.TrustManagerImpl");
    TrustManagerImpl.verifyChain.implementation = function() {
        console.log("TrustManager verification bypassed");
        return arguments[0];  // Return the certificate chain without verification
    };

    // Hook SSLContext
    var SSLContext = Java.use("javax.net.ssl.SSLContext");
    SSLContext.init.overload(
        "[Ljavax.net.ssl.KeyManager;",
        "[Ljavax.net.ssl.TrustManager;",
        "java.security.SecureRandom"
    ).implementation = function(km, tm, sr) {
        console.log("SSLContext.init() called");
        this.init(km, null, sr);  // Pass null for TrustManager to accept all certs
    };
});
Detecting Frida
Apps can detect Frida presence
// Check for Frida server
try {
    Process process = Runtime.getRuntime().exec("su -c ls /data/local/tmp/");
    BufferedReader reader = new BufferedReader(
        new InputStreamReader(process.getInputStream()));
    String line;
    while ((line = reader.readLine()) != null) {
        if (line.contains("frida-server")) {
            Log.w("Security", "Frida server detected!");
            // App may exit or refuse to function
        }
    }
} catch (Exception e) {
    // No root or command failed
}

// Check for Frida libraries in memory
File[] libs = new File("/proc/self/maps").exists() ?
    new File("/proc/self/").listFiles() : null;
// Scan for frida-agent or frida-gadget
Anti-Frida Bypass
Rename Frida components
# Rename frida-server to hide it
adb push frida-server /data/local/tmp/system_daemon
adb shell chmod 755 /data/local/tmp/system_daemon
adb shell /data/local/tmp/system_daemon &

# Use Frida with custom names
frida -U -n com.example.app --realm=native -l script.js
Root Detection
Apps check for root access
// Common root detection methods
public boolean isRooted() {
    // Check for su binary
    String[] paths = {
        "/system/app/Superuser.apk",
        "/sbin/su", "/system/bin/su", "/system/xbin/su",
        "/data/local/xbin/su", "/data/local/bin/su",
        "/system/sd/xbin/su", "/system/bin/failsafe/su",
        "/data/local/su", "/su/bin/su"
    };
    for (String path : paths) {
        if (new File(path).exists()) return true;
    }

    // Try to execute su
    try {
        Process process = Runtime.getRuntime().exec("su");
        return true;
    } catch (Exception e) {
        return false;
    }
}
Bypassing Root Detection
Hide root from apps
# Use Magisk with MagiskHide
magisk --hide com.example.app

# Or use Shamiko module for better hiding
# Install Shamiko through Magisk Manager

# Rename Magisk app
# Settings > Hide Magisk Manager > Enter random name
Traffic Interception
Intercept HTTPS traffic for testing Install CA certificate , configure proxy , bypass certificate pinning , and analyze traffic
Burp Suite Setup
Configure device proxy
# Set proxy via ADB
adb shell settings put global http_proxy 192.168.1.100:8080

# Clear proxy
adb shell settings put global http_proxy :0
Install Burp CA certificate in system trust store , and intercept traffic
Cryptography
Android Keystore API
Hardware-backed key storage Keys never leave secure hardware , operations performed in TEE , and provides strongest protection
Using Keystore
Generate and use keys
KeyGenerator keyGen = KeyGenerator.getInstance(
    KeyProperties.KEY_ALGORITHM_AES, "AndroidKeyStore");
keyGen.init(new KeyGenParameterSpec.Builder(
    "my_key", KeyProperties.PURPOSE_ENCRYPT | KeyProperties.PURPOSE_DECRYPT)
    .setBlockModes(KeyProperties.BLOCK_MODE_GCM)
    .setEncryptionPaddings(KeyProperties.ENCRYPTION_PADDING_NONE)
    .build());
SecretKey key = keyGen.generateKey();
Encryption Algorithms
AES for symmetric encryption and RSA for asymmetric operations Android supports industry-standard encryption algorithms through Java Cryptography Architecture (JCA) and native BoringSSL library , proper algorithm selection and implementation is critical for security , and understanding cipher modes , padding schemes , and key management separates secure code from vulnerable implementations that look correct but fail catastrophically
AES Symmetric Encryption
Advanced Encryption Standard is the gold standard for symmetric crypto AES uses 128-bit , 192-bit , or 256-bit keys , operates on 128-bit blocks , and provides confidentiality for data at rest and in transit when implemented correctly with proper modes and padding
// Correct AES-GCM implementation (AEAD cipher)
KeyGenerator keyGen = KeyGenerator.getInstance("AES");
keyGen.init(256);  // 256-bit key
SecretKey secretKey = keyGen.generateKey();

Cipher cipher = Cipher.getInstance("AES/GCM/NoPadding");
cipher.init(Cipher.ENCRYPT_MODE, secretKey);

// GCM provides authentication - no separate MAC needed
byte[] iv = cipher.getIV();  // Save this for decryption
byte[] ciphertext = cipher.doFinal(plaintext);

// For decryption
GCMParameterSpec spec = new GCMParameterSpec(128, iv);  // 128-bit auth tag
cipher.init(Cipher.DECRYPT_MODE, secretKey, spec);
byte[] decrypted = cipher.doFinal(ciphertext);
AES Cipher Modes
Mode selection dramatically affects security ECB (Electronic Codebook) is completely insecure - never use it because identical plaintext blocks produce identical ciphertext revealing patterns , CBC (Cipher Block Chaining) requires random IV and is vulnerable to padding oracle attacks , CTR (Counter) mode turns block cipher into stream cipher , GCM (Galois/Counter Mode) provides authenticated encryption preventing tampering , and GCM should be your default choice for new code
// WRONG - ECB mode reveals patterns
Cipher badCipher = Cipher.getInstance("AES/ECB/PKCS5Padding");
// Never use this - it's fundamentally broken

// BETTER - CBC with random IV
Cipher cbcCipher = Cipher.getInstance("AES/CBC/PKCS5Padding");
cbcCipher.init(Cipher.ENCRYPT_MODE, key);
byte[] iv = cbcCipher.getIV();  // Random IV generated automatically
// But still vulnerable to padding oracle attacks

// BEST - GCM provides confidentiality AND authenticity
Cipher gcmCipher = Cipher.getInstance("AES/GCM/NoPadding");
gcmCipher.init(Cipher.ENCRYPT_MODE, key);
// GCM is AEAD - authenticated encryption with associated data
Initialization Vectors
IV must be unique for each encryption operation Never reuse IV with same key in GCM mode - catastrophic security failure , CBC mode needs random unpredictable IV , CTR mode needs unique nonce , and IV doesn't need to be secret but must be transmitted with ciphertext for decryption
// Generate random IV
SecureRandom random = new SecureRandom();
byte[] iv = new byte[12];  // 96 bits for GCM
random.nextBytes(iv);

GCMParameterSpec spec = new GCMParameterSpec(128, iv);
cipher.init(Cipher.ENCRYPT_MODE, key, spec);

// Store IV with ciphertext
// Format: [IV][Ciphertext][AuthTag]
RSA Asymmetric Encryption
RSA for key exchange and digital signatures RSA uses public/private key pairs , public key encrypts or verifies , private key decrypts or signs , and RSA is slow so typically used to encrypt symmetric keys not bulk data
// Generate RSA key pair
KeyPairGenerator keyGen = KeyPairGenerator.getInstance("RSA");
keyGen.initialize(2048);  // Minimum 2048 bits, prefer 4096
KeyPair keyPair = keyGen.generateKeyPair();

// Encrypt with public key
Cipher cipher = Cipher.getInstance("RSA/ECB/OAEPWithSHA-256AndMGF1Padding");
cipher.init(Cipher.ENCRYPT_MODE, keyPair.getPublic());
byte[] encrypted = cipher.doFinal(plaintext);

// Decrypt with private key
cipher.init(Cipher.DECRYPT_MODE, keyPair.getPrivate());
byte[] decrypted = cipher.doFinal(encrypted);
RSA Padding Schemes
OAEP padding prevents attacks PKCS#1 v1.5 padding is vulnerable to chosen ciphertext attacks , OAEP (Optimal Asymmetric Encryption Padding) provides semantic security , always use OAEP with SHA-256 or better , and never use "RSA/ECB/NoPadding" which is textbook RSA and completely broken
// WRONG - Vulnerable PKCS#1 v1.5
Cipher bad = Cipher.getInstance("RSA/ECB/PKCS1Padding");
// Vulnerable to Bleichenbacher's attack

// CORRECT - OAEP padding
Cipher good = Cipher.getInstance("RSA/ECB/OAEPWithSHA-256AndMGF1Padding");
// Provides semantic security
Hybrid Encryption
Combine RSA and AES for efficiency Generate random AES key , encrypt data with AES , encrypt AES key with RSA public key , transmit encrypted key and encrypted data , and recipient decrypts AES key with RSA private key then decrypts data with AES
// Sender side
SecretKey aesKey = KeyGenerator.getInstance("AES").generateKey();
Cipher aesCipher = Cipher.getInstance("AES/GCM/NoPadding");
aesCipher.init(Cipher.ENCRYPT_MODE, aesKey);
byte[] encryptedData = aesCipher.doFinal(largeData);

Cipher rsaCipher = Cipher.getInstance("RSA/ECB/OAEPWithSHA-256AndMGF1Padding");
rsaCipher.init(Cipher.ENCRYPT_MODE, recipientPublicKey);
byte[] encryptedKey = rsaCipher.doFinal(aesKey.getEncoded());

// Send both encryptedKey and encryptedData

// Receiver side
rsaCipher.init(Cipher.DECRYPT_MODE, myPrivateKey);
byte[] aesKeyBytes = rsaCipher.doFinal(encryptedKey);
SecretKey recoveredKey = new SecretKeySpec(aesKeyBytes, "AES");

aesCipher.init(Cipher.DECRYPT_MODE, recoveredKey,
    new GCMParameterSpec(128, iv));
byte[] decryptedData = aesCipher.doFinal(encryptedData);
Key Derivation Functions
Derive encryption keys from passwords PBKDF2 applies hash function many times to slow down brute force , scrypt adds memory hardness , Argon2 is modern standard , and never use password directly as encryption key
// Derive AES key from password using PBKDF2
String password = "user_password";
byte[] salt = new byte[16];
new SecureRandom().nextBytes(salt);

PBEKeySpec spec = new PBEKeySpec(
    password.toCharArray(),
    salt,
    100000,  // Iterations - higher is slower and more secure
    256      // Key length in bits
);

SecretKeyFactory factory = SecretKeyFactory.getInstance("PBKDF2WithHmacSHA256");
byte[] keyBytes = factory.generateSecret(spec).getEncoded();
SecretKey key = new SecretKeySpec(keyBytes, "AES");

// Store salt with encrypted data for later decryption
Common Encryption Mistakes
Hard-coded keys in source code
// WRONG - Key visible in decompiled code
byte[] key = {0x01, 0x02, 0x03, ...};  // Never do this
SecretKey secretKey = new SecretKeySpec(key, "AES");

// CORRECT - Generate key and store in Android Keystore
KeyGenerator keyGen = KeyGenerator.getInstance(
    KeyProperties.KEY_ALGORITHM_AES, "AndroidKeyStore");
keyGen.init(new KeyGenParameterSpec.Builder(
    "my_key",
    KeyProperties.PURPOSE_ENCRYPT | KeyProperties.PURPOSE_DECRYPT)
    .setBlockModes(KeyProperties.BLOCK_MODE_GCM)
    .setEncryptionPaddings(KeyProperties.ENCRYPTION_PADDING_NONE)
    .build());
SecretKey key = keyGen.generateKey();
Using ECB mode
// WRONG - Reveals patterns in plaintext
Cipher.getInstance("AES/ECB/PKCS5Padding");

// CORRECT - Use GCM or CBC
Cipher.getInstance("AES/GCM/NoPadding");
Reusing IVs
// WRONG - Same IV for multiple encryptions
byte[] iv = new byte[12];
// Using same iv repeatedly with same key

// CORRECT - Generate new random IV for each encryption
SecureRandom random = new SecureRandom();
byte[] iv = new byte[12];
random.nextBytes(iv);  // New IV every time
Authenticated Encryption
Encryption without authentication is vulnerable Attacker can modify ciphertext , use AEAD modes like GCM or CCM , or encrypt-then-MAC with separate operations , and never use encrypt-and-MAC or MAC-then-encrypt which are both broken
// CORRECT - GCM provides built-in authentication
Cipher cipher = Cipher.getInstance("AES/GCM/NoPadding");
cipher.init(Cipher.ENCRYPT_MODE, key);
byte[] ciphertext = cipher.doFinal(plaintext);
// Ciphertext includes authentication tag

// ALSO CORRECT - Encrypt-then-MAC manually
Cipher cipher = Cipher.getInstance("AES/CBC/PKCS5Padding");
cipher.init(Cipher.ENCRYPT_MODE, key);
byte[] ciphertext = cipher.doFinal(plaintext);

Mac mac = Mac.getInstance("HmacSHA256");
mac.init(macKey);  // Different key for MAC
byte[] tag = mac.doFinal(ciphertext);
// Verify tag before decryption
ChaCha20-Poly1305
Modern alternative to AES-GCM ChaCha20 stream cipher with Poly1305 authenticator , faster than AES on devices without hardware AES acceleration , and available on Android 10+
// ChaCha20-Poly1305 AEAD cipher
Cipher cipher = Cipher.getInstance("ChaCha20-Poly1305");
cipher.init(Cipher.ENCRYPT_MODE, key);
byte[] nonce = cipher.getIV();  // 96-bit nonce
byte[] ciphertext = cipher.doFinal(plaintext);
Hashing Functions
SHA-256 and SHA-512 for cryptographic hashing Hash functions create fixed-size fingerprints of arbitrary data , one-way transformation that can't be reversed , collision-resistant meaning finding two inputs with same hash is computationally infeasible , and critical for password storage , data integrity verification , and digital signatures
SHA-2 Family
SHA-256 produces 256-bit hash SHA-512 produces 512-bit hash , both are secure and widely supported , SHA-1 is broken and should never be used , MD5 is completely broken with practical collision attacks , and always use SHA-256 minimum for new applications
// SHA-256 hashing
MessageDigest digest = MessageDigest.getInstance("SHA-256");
byte[] hash = digest.digest(data);

// Convert to hex string for display
StringBuilder hexString = new StringBuilder();
for (byte b : hash) {
    String hex = Integer.toHexString(0xff & b);
    if (hex.length() == 1) hexString.append('0');
    hexString.append(hex);
}
String hashString = hexString.toString();
# Hash file with SHA-256
adb shell sha256sum /sdcard/file.txt

# Hash string
echo -n "test" | sha256sum
Password Hashing
Never store passwords in plaintext or with simple hashes Use password hashing functions designed to be slow , PBKDF2 is minimum acceptable , bcrypt is better , scrypt adds memory hardness , Argon2 is modern standard winning Password Hashing Competition , and always use random salt per password
// WRONG - Simple SHA-256 of password
MessageDigest md = MessageDigest.getInstance("SHA-256");
byte[] hash = md.digest(password.getBytes());
// Vulnerable to rainbow tables and GPU cracking

// CORRECT - PBKDF2 with salt and iterations
SecureRandom random = new SecureRandom();
byte[] salt = new byte[16];
random.nextBytes(salt);

PBEKeySpec spec = new PBEKeySpec(
    password.toCharArray(),
    salt,
    100000,  // Iterations - adjust based on performance requirements
    256      // Hash length
);

SecretKeyFactory factory = SecretKeyFactory.getInstance("PBKDF2WithHmacSHA256");
byte[] hash = factory.generateSecret(spec).getEncoded();

// Store both salt and hash
// Format: salt + hash or store separately in database
Salt Requirements
Salt must be random and unique per password Prevents rainbow table attacks , prevents identifying users with same password , should be at least 128 bits , doesn't need to be secret but must be stored with hash , and never reuse salt across different passwords
// Generate cryptographically secure random salt
SecureRandom random = new SecureRandom();
byte[] salt = new byte[16];  // 128 bits
random.nextBytes(salt);

// Store salt with hash in database
// user_id | salt (base64) | hash (base64)
Password Verification
Hash submitted password with stored salt and compare
// Retrieve stored salt and hash from database
byte[] storedSalt = Base64.decode(saltFromDB, Base64.DEFAULT);
byte[] storedHash = Base64.decode(hashFromDB, Base64.DEFAULT);

// Hash submitted password with same salt and iterations
PBEKeySpec spec = new PBEKeySpec(
    submittedPassword.toCharArray(),
    storedSalt,
    100000,  // Must match original iteration count
    256
);

SecretKeyFactory factory = SecretKeyFactory.getInstance("PBKDF2WithHmacSHA256");
byte[] computedHash = factory.generateSecret(spec).getEncoded();

// Constant-time comparison to prevent timing attacks
boolean passwordMatch = MessageDigest.isEqual(computedHash, storedHash);
HMAC - Hash-based Message Authentication Code
HMAC provides integrity and authenticity Combines hash function with secret key , verifies data hasn't been tampered with , verifies data came from holder of secret key , and used for API request signing and message authentication
// Generate HMAC-SHA256
SecretKey key = new SecretKeySpec(keyBytes, "HmacSHA256");
Mac mac = Mac.getInstance("HmacSHA256");
mac.init(key);
byte[] hmac = mac.doFinal(message);

// Verify HMAC
Mac verifyMac = Mac.getInstance("HmacSHA256");
verifyMac.init(key);
byte[] computedHmac = verifyMac.doFinal(message);
boolean valid = MessageDigest.isEqual(hmac, computedHmac);
File Integrity Verification
Hash files to detect tampering
// Calculate file hash
MessageDigest digest = MessageDigest.getInstance("SHA-256");
FileInputStream fis = new FileInputStream(file);
byte[] buffer = new byte[8192];
int bytesRead;
while ((bytesRead = fis.read(buffer)) != -1) {
    digest.update(buffer, 0, bytesRead);
}
byte[] fileHash = digest.digest();

// Compare with known good hash
boolean fileIntact = MessageDigest.isEqual(fileHash, knownGoodHash);
# Verify APK integrity
sha256sum app.apk
# Compare output with developer-provided hash

# Verify system partition hasn't been modified
adb shell sha256sum /system/build.prop
Common Hashing Mistakes
Using MD5 or SHA-1 for security
// WRONG - MD5 is broken
MessageDigest.getInstance("MD5");

// WRONG - SHA-1 is broken
MessageDigest.getInstance("SHA-1");

// CORRECT - Use SHA-256 or better
MessageDigest.getInstance("SHA-256");
Not salting passwords
// WRONG - No salt, vulnerable to rainbow tables
byte[] hash = MessageDigest.getInstance("SHA-256")
    .digest(password.getBytes());

// CORRECT - Random salt per password
// Use PBKDF2 as shown above
Using fast hashes for passwords
// WRONG - SHA-256 is too fast for passwords
// GPUs can try billions of hashes per second
// CORRECT - Use slow password hashing function
// PBKDF2, bcrypt, scrypt, or Argon2
Hash Length Extension Attacks
SHA-256 vulnerable to length extension If using hash for authentication , attacker can append data and compute valid hash without knowing secret , HMAC prevents this attack , or use SHA-3 which isn't vulnerable
// VULNERABLE - Simple hash for authentication
String message = "user_id=123&action=view";
byte[] hash = sha256(secret + message);
// Attacker can extend message and compute valid hash
// SECURE - Use HMAC instead
Mac mac = Mac.getInstance("HmacSHA256");
mac.init(secretKey);
byte[] hmac = mac.doFinal(message.getBytes());
// Attacker can't forge HMAC without secret key
Constant-Time Comparison
Prevent timing attacks when comparing hashes
// WRONG - Early exit reveals information through timing
public boolean unsafeCompare(byte[] a, byte[] b) {
if (a.length != b.length) return false;
for (int i = 0; i < a.length; i++) {
if (a[i] != b[i]) return false; // Early exit
}
return true;
}
// CORRECT - Constant time comparison
public boolean safeCompare(byte[] a, byte[] b) {
return MessageDigest.isEqual(a, b); // Constant time
}
Secure Random Generation
Use SecureRandom for all cryptographic operations Random number generation is foundation of cryptography , weak randomness breaks encryption regardless of algorithm strength , Android's SecureRandom uses hardware RNG when available , and never use java.util.Random for security-critical operations because it's completely predictable
SecureRandom Basics
Cryptographically secure pseudorandom number generator
// Correct usage
SecureRandom random = new SecureRandom();
// Generate random bytes
byte[] randomBytes = new byte[32];
random.nextBytes(randomBytes);
// Generate random int
int randomInt = random.nextInt();
// Generate random int in range [0, bound)
int randomInRange = random.nextInt(100); // 0-99
Why Not java.util.Random
Regular Random is completely insecure
// WRONG - Predictable after observing a few outputs
Random bad = new Random();
byte[] bytes = new byte[16];
bad.nextBytes(bytes); // Attacker can predict future values
// CORRECT - Cryptographically secure
SecureRandom good = new SecureRandom();
good.nextBytes(bytes); // Unpredictable even with many observations
Regular Random uses linear congruential generator with only 48 bits of state , attacker can determine internal state from output , all future values become predictable , and this completely breaks any crypto using it
Entropy Sources
SecureRandom gathers entropy from multiple sources Hardware RNG if available (/dev/hw_random) , kernel entropy pool (/dev/urandom) , system events like interrupts and disk I/O , and Android automatically seeds SecureRandom from these sources
# Check hardware RNG availability
adb shell ls -l /dev/hw_random
# View kernel entropy
adb shell cat /proc/sys/kernel/random/entropy_avail
# Read random bytes from urandom
adb shell head -c 32 /dev/urandom | base64
Seeding SecureRandom
Android handles seeding automatically
// Default constructor uses system entropy
SecureRandom random = new SecureRandom();
// Already properly seeded - don't manually seed unless you know what you're doing
// WRONG - Manual seeding with weak seed
SecureRandom bad = new SecureRandom();
bad.setSeed(System.currentTimeMillis()); // Predictable seed
// This reduces security to ~32 bits
// If you must provide additional entropy
SecureRandom good = new SecureRandom();
byte[] additionalEntropy = getEntropyFromSomewhere();
good.setSeed(additionalEntropy); // Mixes in additional entropy
// But default seeding is usually sufficient
Generating Cryptographic Keys
Use SecureRandom for key generation
// Generate AES key
KeyGenerator keyGen = KeyGenerator.getInstance("AES");
keyGen.init(256, new SecureRandom()); // Explicitly use SecureRandom
SecretKey key = keyGen.generateKey();
// Generate random salt
SecureRandom random = new SecureRandom();
byte[] salt = new byte[16];
random.nextBytes(salt);
// Generate random IV
byte[] iv = new byte[12]; // 96 bits for GCM
random.nextBytes(iv);
UUID Generation
Use UUID.randomUUID() for random UUIDs
// Correct - Uses SecureRandom internally
UUID uuid = UUID.randomUUID();
// Don't use sequential UUIDs for security tokens
// They're predictable
Session Token Generation
Generate unpredictable session tokens
// Generate secure session token
SecureRandom random = new SecureRandom();
byte[] tokenBytes = new byte[32]; // 256 bits
random.nextBytes(tokenBytes);
// Encode as hex or base64
String sessionToken = Base64.encodeToString(
tokenBytes, Base64.URL_SAFE | Base64.NO_WRAP);
Common Mistakes
Using timestamp as seed
// WRONG - Timestamp has low entropy
SecureRandom bad = new SecureRandom();
bad.setSeed(System.currentTimeMillis());
// Attacker can brute force ~32 bits
// CORRECT - Let Android handle seeding
SecureRandom good = new SecureRandom();
// Uses hardware RNG and kernel entropy
Using Math.random() for security
// WRONG - Not cryptographically secure
double random = Math.random();
int token = (int)(random * Integer.MAX_VALUE);
// Completely predictable
// CORRECT - Use SecureRandom
SecureRandom sr = new SecureRandom();
int token = sr.nextInt();
Performance Considerations
SecureRandom is slower than Random Hardware RNG access has overhead , entropy gathering takes time , but security is worth the cost , and for non-security uses regular Random is fine
// For game physics or simulations - Random is fine
Random gameRandom = new Random();
int diceRoll = gameRandom.nextInt(6) + 1;
// For cryptography - always SecureRandom
SecureRandom cryptoRandom = new SecureRandom();
byte[] encryptionKey = new byte[32];
cryptoRandom.nextBytes(encryptionKey);
Testing Random Number Generation
Verify randomness quality
# Generate random data
adb shell "head -c 1000000 /dev/urandom" > random.bin
# Test with dieharder or ent
dieharder -a -f random.bin
ent random.bin
# Check for patterns
hexdump -C random.bin | head -50
Key Attestation
Verify key properties and prove hardware backing Key attestation generates cryptographically signed certificate that proves key exists in secure hardware , includes device security state like bootloader lock status and verified boot state , enables remote verification that keys haven't been extracted , and provides assurance that cryptographic operations happen in tamper-resistant environment not software emulation
Attestation Certificate Chain
Hardware-backed keys come with certificate chain Root certificate burned into device hardware at manufacturing , intermediate certificates sign attestation certificates , leaf certificate contains key being attested and device security properties , and entire chain cryptographically proves key authenticity
// Generate key with attestation
KeyGenParameterSpec spec = new KeyGenParameterSpec.Builder(
"attested_key",
KeyProperties.PURPOSE_SIGN | KeyProperties.PURPOSE_VERIFY)
.setAlgorithmParameterSpec(new ECGenParameterSpec("secp256r1"))
.setDigests(KeyProperties.DIGEST_SHA256)
.setAttestationChallenge(challenge) // Nonce from server
.build();
KeyPairGenerator keyGen = KeyPairGenerator.getInstance(
KeyProperties.KEY_ALGORITHM_EC, "AndroidKeyStore");
keyGen.initialize(spec);
KeyPair keyPair = keyGen.generateKeyPair();
// Retrieve attestation certificate chain
KeyStore keyStore = KeyStore.getInstance("AndroidKeyStore");
keyStore.load(null);
Certificate[] chain = keyStore.getCertificateChain("attested_key");
// Send chain to server for verification
Attestation Extension
X.509 extension contains security properties
// Parse attestation extension from certificate
X509Certificate cert = (X509Certificate) chain[0];
byte[] attestationExtension = cert.getExtensionValue("1.3.6.1.4.1.11129.2.1.17");
// Extension contains:
// - Attestation version
// - Attestation security level (SOFTWARE, TRUSTED_ENVIRONMENT, STRONGBOX)
// - Key description (algorithm, key size, purpose)
// - Device properties (verified boot state, bootloader locked)
Security Levels
Attestation indicates where key is stored SOFTWARE means key in Android OS (least secure) , TRUSTED_ENVIRONMENT means key in TrustZone TEE (secure) , STRONGBOX means key in dedicated secure element (most secure) , and server should reject SOFTWARE attestation for sensitive operations
Verified Boot State
Attestation includes boot verification status VERIFIED means device boots only signed code , SELF_SIGNED means custom ROM with user key , UNVERIFIED means no boot verification , FAILED means verification failed , and production apps should only trust VERIFIED state
Bootloader Lock State
Locked bootloader required for security Attestation includes bootloader lock status , locked prevents flashing unsigned images , unlocked allows custom ROMs but fails SafetyNet , and banking apps typically require locked bootloader
// Server-side verification pseudocode
public boolean verifyAttestation(Certificate[] chain, byte[] challenge) {
// 1. Verify certificate chain up to Google root
if (!verifyCertificateChain(chain)) return false;
// 2. Parse attestation extension
AttestationExtension ext = parseExtension(chain[0]);
// 3. Verify challenge matches
if (!Arrays.equals(ext.attestationChallenge, challenge)) return false;
// 4. Check security level
if (ext.attestationSecurityLevel != STRONGBOX &&
ext.attestationSecurityLevel != TRUSTED_ENVIRONMENT) {
return false; // Reject software keys
}
// 5. Verify boot state
if (ext.verifiedBootState != VERIFIED) return false;
// 6. Check bootloader locked
if (!ext.bootloaderLocked) return false;
return true;
}
Attestation Challenge
Server provides random nonce Challenge prevents replay attacks , must be cryptographically random , server generates fresh challenge for each attestation , and attestation certificate includes this challenge proving freshness
// Server generates challenge
SecureRandom random = new SecureRandom();
byte[] challenge = new byte[32];
random.nextBytes(challenge);
// Send challenge to client
// Client includes in attestation request
// Server verifies challenge in returned certificate
Google Hardware Attestation
Google provides root CA for verification Root certificate available from Google , intermediate certificates chain to root , and server verifies entire chain to prove authenticity
# Download Google hardware attestation root
wget https://developer.android.com/training/articles/security-key-attestation
# Verify certificate chain
openssl verify -CAfile google_root.pem -untrusted intermediate.pem leaf.pem
StrongBox Attestation
Highest security level available StrongBox is dedicated tamper-resistant chip , separate from main CPU and TrustZone , provides strongest key protection , and available on high-end devices Android 9+
// Request StrongBox attestation
KeyGenParameterSpec spec = new KeyGenParameterSpec.Builder(
"strongbox_key",
KeyProperties.PURPOSE_SIGN)
.setIsStrongBoxBacked(true) // Require StrongBox
.setAttestationChallenge(challenge)
.build();
// Will fail if StrongBox not available
Attestation Use Cases
Prove device hasn't been rooted or tampered Banking apps verify device security state , payment apps ensure keys in secure hardware , enterprise apps validate managed device compliance , and remote attestation enables zero-trust architecture
Limitations
Attestation doesn't prevent all attacks Doesn't detect runtime hooking with Frida after attestation , doesn't prevent screen recording or keylogging , and attestation is point-in-time check not continuous monitoring
Testing Attestation
Verify attestation implementation
# Check if device supports key attestation
adb shell pm list features | grep android.hardware.keystore
# Check StrongBox support
adb shell pm list features | grep strongbox
# View attestation certificate
# Extract from app and parse with openssl
openssl x509 -in attestation.pem -text -noout
Biometric Authentication
Fingerprint and face unlock for user authentication BiometricPrompt API provides unified interface for all biometric modalities , hardware-backed authentication runs in TrustZone TEE , biometric data never leaves secure hardware , integrates with Android Keystore for cryptographic operations , and provides strong authentication without passwords while maintaining security through hardware isolation
BiometricPrompt API
Modern unified biometric authentication
// Create BiometricPrompt
BiometricPrompt biometricPrompt = new BiometricPrompt(
this,
ContextCompat.getMainExecutor(this),
new BiometricPrompt.AuthenticationCallback() {
@Override
public void onAuthenticationSucceeded(
BiometricPrompt.AuthenticationResult result) {
// User authenticated successfully
BiometricPrompt.CryptoObject crypto = result.getCryptoObject();
// Use crypto object for encryption/decryption
}
@Override
public void onAuthenticationFailed() {
// Biometric doesn't match but user can retry
}
@Override
public void onAuthenticationError(int errorCode, CharSequence errString) {
// Permanent error - too many attempts or user cancelled
}
}
);
// Configure prompt
BiometricPrompt.PromptInfo promptInfo = new BiometricPrompt.PromptInfo.Builder()
.setTitle("Biometric Authentication")
.setSubtitle("Authenticate to access secure data")
.setNegativeButtonText("Use Password") // Fallback option
.setAllowedAuthenticators(
BiometricManager.Authenticators.BIOMETRIC_STRONG |
BiometricManager.Authenticators.DEVICE_CREDENTIAL
)
.build();
// Show prompt
biometricPrompt.authenticate(promptInfo);
Authenticator Strength Classes
Three security levels for biometrics BIOMETRIC_STRONG (Class 3) requires hardware-backed biometric with spoof and presentation attack detection , BIOMETRIC_WEAK (Class 2) allows software biometrics with lower security , DEVICE_CREDENTIAL includes PIN/pattern/password , and apps should use BIOMETRIC_STRONG for sensitive operations
// Check biometric availability and strength
BiometricManager biometricManager = BiometricManager.from(this);
int canAuthenticate = biometricManager.canAuthenticate(
BiometricManager.Authenticators.BIOMETRIC_STRONG
);
switch (canAuthenticate) {
case BiometricManager.BIOMETRIC_SUCCESS:
// Strong biometric available
break;
case BiometricManager.BIOMETRIC_ERROR_NO_HARDWARE:
// No biometric hardware
break;
case BiometricManager.BIOMETRIC_ERROR_HW_UNAVAILABLE:
// Hardware unavailable (temporary)
break;
case BiometricManager.BIOMETRIC_ERROR_NONE_ENROLLED:
// User hasn't enrolled biometrics
// Prompt to enroll
Intent enrollIntent = new Intent(Settings.ACTION_BIOMETRIC_ENROLL);
enrollIntent.putExtra(Settings.EXTRA_BIOMETRIC_AUTHENTICATORS_ALLOWED,
BiometricManager.Authenticators.BIOMETRIC_STRONG);
startActivity(enrollIntent);
break;
}
Crypto-Bound Authentication
Bind authentication to cryptographic operations
// Generate key that requires biometric authentication
KeyGenParameterSpec spec = new KeyGenParameterSpec.Builder(
"biometric_key",
KeyProperties.PURPOSE_ENCRYPT | KeyProperties.PURPOSE_DECRYPT)
.setBlockModes(KeyProperties.BLOCK_MODE_GCM)
.setEncryptionPaddings(KeyProperties.ENCRYPTION_PADDING_NONE)
.setUserAuthenticationRequired(true)
.setUserAuthenticationParameters(
0, // 0 means auth required for every use
KeyProperties.AUTH_BIOMETRIC_STRONG
)
.build();
KeyGenerator keyGen = KeyGenerator.getInstance(
KeyProperties.KEY_ALGORITHM_AES, "AndroidKeyStore");
keyGen.init(spec);
SecretKey key = keyGen.generateKey();
// Initialize cipher with biometric-protected key
Cipher cipher = Cipher.getInstance("AES/GCM/NoPadding");
cipher.init(Cipher.ENCRYPT_MODE, key);
// Wrap cipher in CryptoObject
BiometricPrompt.CryptoObject cryptoObject =
new BiometricPrompt.CryptoObject(cipher);
// Authenticate with crypto binding
biometricPrompt.authenticate(promptInfo, cryptoObject);
// In onAuthenticationSucceeded callback
Cipher authenticatedCipher = result.getCryptoObject().getCipher();
byte[] encrypted = authenticatedCipher.doFinal(sensitiveData);
// Encryption only succeeds after biometric authentication
Hardware Integration
Biometric authentication happens in TrustZone Fingerprint sensor data goes directly to TEE , matching algorithms run in secure world , Android only receives success/failure result , biometric templates never exposed to Android OS , and even root access can't extract fingerprint data from secure storage
# Check biometric hardware
adb shell pm list features | grep android.hardware.fingerprint
adb shell pm list features | grep android.hardware.biometrics.face
# View biometric services
adb shell dumpsys fingerprint
adb shell dumpsys face
# Check if biometrics enrolled
adb shell dumpsys biometric
Fingerprint Authentication
Most common biometric modality Capacitive or optical sensor captures fingerprint , secure processor extracts minutiae points , template stored in TrustZone encrypted storage , matching happens in TEE with threshold for acceptance , and false acceptance rate typically 1 in 50000
Face Authentication
2D or 3D face recognition 2D uses camera and software (BIOMETRIC_WEAK) , 3D uses depth sensors and secure hardware (BIOMETRIC_STRONG) , Apple Face ID and Android face unlock on Pixel use 3D , vulnerable to photos/videos in 2D mode , and 3D mode includes liveness detection
Iris Scanning
High-security biometric option Infrared camera captures iris pattern , very low false acceptance rate , requires specialized hardware , and less common on consumer devices
Authentication Timeout
Keys can require recent authentication
// Key requires authentication within last 30 seconds
KeyGenParameterSpec spec = new KeyGenParameterSpec.Builder(
"timeout_key",
KeyProperties.PURPOSE_ENCRYPT | KeyProperties.PURPOSE_DECRYPT)
.setUserAuthenticationRequired(true)
.setUserAuthenticationParameters(
30, // Timeout in seconds
KeyProperties.AUTH_BIOMETRIC_STRONG
)
.build();
// After successful authentication, key is unlocked for 30 seconds
// Subsequent operations within timeout don't require re-authentication
Fallback Authentication
Provide alternative when biometrics fail
// Allow device credential (PIN/pattern/password) as fallback
BiometricPrompt.PromptInfo promptInfo = new BiometricPrompt.PromptInfo.Builder()
.setTitle("Authenticate")
.setAllowedAuthenticators(
BiometricManager.Authenticators.BIOMETRIC_STRONG |
BiometricManager.Authenticators.DEVICE_CREDENTIAL // Fallback
)
.build();
// No negative button needed when device credential allowed
Security Considerations
Biometrics aren't passwords Can't be changed if compromised , should unlock cryptographic key not be the key itself , use crypto-bound authentication for sensitive operations , implement rate limiting and lockout after failures , and always provide fallback to device credential
Attack Vectors
Presentation attacks try to fool sensors Photos or videos for face recognition , fake fingerprints from lifted prints , 3D printed faces , and strong biometrics include liveness detection to prevent these attacks
Testing Biometric Authentication
Emulator supports simulated biometrics
# Enable biometric authentication in emulator
adb shell settings put secure biometric_virtual_enabled 1
# Simulate successful authentication
adb shell cmd biometric_virtual authenticate
# Simulate failed authentication
adb shell cmd biometric_virtual reject
# Check enrolled biometrics
adb shell dumpsys biometric
Legacy Fingerprint API
Deprecated FingerprintManager
// DON'T USE - Deprecated in Android 9
FingerprintManager fingerprintManager =
(FingerprintManager) getSystemService(Context.FINGERPRINT_SERVICE);
// USE BiometricPrompt instead
// Provides unified API for all biometric types
Best Practices
Use BiometricPrompt for all biometric authentication Require BIOMETRIC_STRONG for sensitive operations , bind authentication to cryptographic operations , implement proper fallback mechanisms , handle all error cases gracefully , respect user privacy by not storing biometric data , and test with multiple biometric modalities
Rate Limiting
System enforces attempt limits Too many failed attempts triggers temporary lockout , lockout duration increases with repeated failures , eventually requires device credential , and prevents brute force attacks on biometric authentication
// System handles rate limiting automatically
// App receives onAuthenticationError with ERROR_LOCKOUT
@Override
public void onAuthenticationError(int errorCode, CharSequence errString) {
if (errorCode == BiometricPrompt.ERROR_LOCKOUT ||
errorCode == BiometricPrompt.ERROR_LOCKOUT_PERMANENT) {
// Too many attempts - user must use device credential
// or wait for timeout
}
}
Privacy Implications
Biometric data is sensitive personal information Never transmit biometric templates over network , don't store biometric data in app storage , rely on system biometric storage in TEE , inform users about biometric usage , and comply with privacy regulations like GDPR
Setting Up Development Environment
Hardware Requirements
Minimum and recommended specs for Android development Development requires decent hardware , emulator is resource-intensive , multiple tools run simultaneously , and proper setup prevents frustration
Minimum Requirements
Basic development possible 8GB RAM minimum but 16GB recommended , 4-core CPU but 8-core better , 10GB free disk space for SDK , SSD strongly recommended over HDD , and 1920x1080 display resolution
Recommended Setup
Optimal development experience 16GB+ RAM for smooth emulator , modern multi-core CPU (Intel i7/i9 or AMD Ryzen 7/9) , 50GB+ SSD storage , dedicated GPU helps with emulator , and multiple monitors boost productivity
# Check system resources on Linux
free -h # RAM
lscpu # CPU info
df -h # Disk space
Android SDK Installation
Install Android SDK command-line tools SDK provides platform tools , build tools , platform versions , and system images for emulator
Download SDK Command-Line Tools
Get latest tools from Google
# Download command-line tools
cd ~/Downloads
wget https://dl.google.com/android/repository/commandlinetools-linux-latest.zip
# Extract to SDK directory
mkdir -p ~/Android/Sdk/cmdline-tools
unzip commandlinetools-linux-latest.zip -d ~/Android/Sdk/cmdline-tools
mv ~/Android/Sdk/cmdline-tools/cmdline-tools ~/Android/Sdk/cmdline-tools/latest
# Set environment variables
echo 'export ANDROID_HOME=$HOME/Android/Sdk' >> ~/.bashrc
echo 'export PATH=$PATH:$ANDROID_HOME/cmdline-tools/latest/bin' >> ~/.bashrc
echo 'export PATH=$PATH:$ANDROID_HOME/platform-tools' >> ~/.bashrc
echo 'export PATH=$PATH:$ANDROID_HOME/emulator' >> ~/.bashrc
source ~/.bashrc
Install SDK Packages
Use sdkmanager to install components
# List available packages
sdkmanager --list
# Install platform tools (adb, fastboot)
sdkmanager "platform-tools"
# Install latest platform
sdkmanager "platforms;android-33"
# Install build tools
sdkmanager "build-tools;33.0.0"
# Install emulator
sdkmanager "emulator"
# Install system image for emulator
sdkmanager "system-images;android-33;google_apis;x86_64"
# Accept licenses
sdkmanager --licenses
Android Studio Setup
Install official Android IDE Android Studio provides integrated development environment , visual layout editor , debugging tools , and performance profilers
Install Android Studio
Download and install
# Download from https://developer.android.com/studio
# Or use snap on Ubuntu
sudo snap install android-studio --classic
# Launch Android Studio
android-studio
# Follow setup wizard to install SDK components
Configure Android Studio
Optimize settings for performance
Settings > Appearance & Behavior > System Settings > Memory Settings
- Increase IDE heap size to 2048 MB
- Increase Gradle daemon heap to 4096 MB
Settings > Build, Execution, Deployment > Compiler
- Enable "Compile independent modules in parallel"
- Set "Command-line Options" to: --parallel --max-workers=8
Settings > Editor > Code Style
- Configure code formatting preferences
Install Useful Plugins
Enhance functionality
Settings > Plugins
- ADB Idea (quick ADB commands)
- Key Promoter X (learn shortcuts)
- Rainbow Brackets (code readability)
- Material Theme UI (better UI)
Android Emulator Configuration
Set up virtual devices for testing Emulator simulates Android devices , faster than physical device for some tasks , easy to reset , and supports various configurations
Create AVD (Android Virtual Device)
Configure virtual device
# List available system images
avdmanager list
# Create AVD
avdmanager create avd -n Pixel_6_API_33 \
-k "system-images;android-33;google_apis;x86_64" \
-d "pixel_6"
# List created AVDs
avdmanager list avd
# Start emulator
emulator -avd Pixel_6_API_33
Emulator Performance
Enable hardware acceleration
# Check KVM support on Linux
egrep -c '(vmx|svm)' /proc/cpuinfo
# Non-zero means hardware virtualization supported
# Install KVM
sudo apt install qemu-kvm libvirt-daemon-system libvirt-clients bridge-utils
# Add user to kvm group
sudo usermod -aG kvm $USER
# Reboot for changes to take effect
Emulator Command-Line Options
Customize emulator behavior
# Start with specific RAM
emulator -avd Pixel_6_API_33 -memory 4096
# Start in writable system mode
emulator -avd Pixel_6_API_33 -writable-system
# Start with proxy
emulator -avd Pixel_6_API_33 -http-proxy 127.0.0.1:8080
# Start with specific GPU mode
emulator -avd Pixel_6_API_33 -gpu host
# Cold boot (don't restore snapshot)
emulator -avd Pixel_6_API_33 -no-snapshot-load
Physical Device Setup
Configure real device for development Physical devices provide accurate testing , test hardware features , and verify performance
Enable Developer Options
Unlock developer menu
1. Go to Settings > About Phone
2. Tap "Build Number" 7 times
3. Developer Options now available in Settings
Enable USB Debugging
Allow ADB connection
Settings > Developer Options > USB Debugging (enable)
# Connect device via USB
adb devices
# First time will show "unauthorized"
# Accept prompt on device screen
Configure USB on Linux
Set up udev rules
# Create udev rules file
sudo nano /etc/udev/rules.d/51-android.rules
# Add rules (example for Google devices)
SUBSYSTEM=="usb", ATTR{idVendor}=="18d1", MODE="0666", GROUP="plugdev"
# Reload udev rules
sudo udevadm control --reload-rules
sudo udevadm trigger
# Reconnect device
adb devices
Rooting Devices
Gain superuser access for testing Root access enables deep system inspection , modify system files , install security tools , and test app behavior with root
Why Root for Security Testing
Root provides full system access Inspect any app's data , modify system settings , install Frida server , use Xposed modules , and bypass security restrictions for testing
Rooting Methods
Different approaches for different devices Unlock bootloader first , flash custom recovery (TWRP) , flash Magisk for systemless root , or use one-click root tools for older devices
Unlock Bootloader
Required first step
# Enable OEM unlocking in Developer Options
# Settings > Developer Options > OEM Unlocking (enable)
# Reboot to bootloader
adb reboot bootloader
# Unlock bootloader (Google Pixel example)
fastboot flashing unlock
# WARNING: This wipes all data
# Reboot
fastboot reboot
Flash Custom Recovery
Install TWRP recovery
# Download TWRP for your device
# From https://twrp.me/Devices/
# Boot to bootloader
adb reboot bootloader
# Flash TWRP
fastboot flash recovery twrp.img
# Boot into recovery
fastboot boot twrp.img
Magisk for Root Management
Modern systemless root solution Magisk provides root without modifying system partition , passes SafetyNet , supports modules , and can hide root from apps
Install Magisk
Flash through custom recovery
# Download latest Magisk APK from GitHub
# https://github.com/topjohnwu/Magisk/releases
# Rename to .zip
mv Magisk-v26.1.apk Magisk-v26.1.zip
# Boot to TWRP recovery
adb reboot recovery
# Flash Magisk zip through TWRP
# Install > Select Magisk zip > Swipe to flash
# Reboot system
# Install Magisk Manager app
Magisk Modules
Extend functionality with modules
Popular modules for security testing:
- Shamiko (advanced root hiding)
- LSPosed (Xposed framework)
- Busybox for Android NDK
- Universal SafetyNet Fix
- MagiskHide Props Config
Hide Magisk from Apps
Bypass root detection
Magisk Manager > Settings
- Enable "Zygisk"
- Configure DenyList
- Add banking apps and games to DenyList
- Repackage Magisk Manager with random name
# Check if Magisk installed
adb shell su -c "magisk -v"
# List Magisk modules
adb shell su -c "ls /data/adb/modules"
Android Programming Fundamentals
Java for Android
Java remains primary Android language Most Android code written in Java , mature ecosystem , extensive documentation , and gradual migration to Kotlin
Basic Android Activity
Minimal Java activity
package com.example.myapp;
import android.app.Activity;
import android.os.Bundle;
import android.widget.TextView;
public class MainActivity extends Activity {
@Override
protected void onCreate(Bundle savedInstanceState) {
super.onCreate(savedInstanceState);
// Create TextView programmatically
TextView textView = new TextView(this);
textView.setText("Hello Android");
setContentView(textView);
}
}
Android-Specific Java Features
Context and Resources
// Get application context
Context context = getApplicationContext();
// Access resources
String appName = getString(R.string.app_name);
int color = getColor(R.color.primary);
Drawable icon = getDrawable(R.drawable.ic_launcher);
// Get system services
LayoutInflater inflater = (LayoutInflater)
getSystemService(Context.LAYOUT_INFLATER_SERVICE);
Kotlin for Android
Modern language for Android development Kotlin is now Google's preferred language , more concise than Java , null-safe by default , and fully interoperable with Java
Kotlin Activity
Cleaner syntax than Java
package com.example.myapp
import android.app.Activity
import android.os.Bundle
import android.widget.TextView
class MainActivity : Activity() {
override fun onCreate(savedInstanceState: Bundle?) {
super.onCreate(savedInstanceState)
val textView = TextView(this).apply {
text = "Hello Kotlin"
}
setContentView(textView)
}
}
Kotlin Extensions
Simplify common tasks
// View binding
import kotlinx.android.synthetic.main.activity_main.*
class MainActivity : AppCompatActivity() {
override fun onCreate(savedInstanceState: Bundle?) {
super.onCreate(savedInstanceState)
setContentView(R.layout.activity_main)
// Direct access to views
textView.text = "Hello"
button.setOnClickListener {
// Handle click
}
}
}
Null Safety
Prevent null pointer exceptions
// Nullable types
var name: String? = null
name = "Android"
// Safe call operator
val length = name?.length
// Elvis operator
val len = name?.length ?: 0
// Non-null assertion (use carefully)
val definiteLength = name!!.length
XML Layouts
Define UI in XML files XML layouts separate UI from logic , support visual editor , enable resource qualifiers , and allow runtime inflation
Basic Layout
LinearLayout example
<?xml version="1.0" encoding="utf-8"?>
<LinearLayout
xmlns:android="http://schemas.android.com/apk/res/android"
android:layout_width="match_parent"
android:layout_height="match_parent"
android:orientation="vertical"
android:padding="16dp">
<TextView
android:id="@+id/titleText"
android:layout_width="match_parent"
android:layout_height="wrap_content"
android:text="Welcome"
android:textSize="24sp"
android:textStyle="bold"/>
<EditText
android:id="@+id/inputField"
android:layout_width="match_parent"
android:layout_height="wrap_content"
android:hint="Enter text"
android:layout_marginTop="16dp"/>
<Button
android:id="@+id/submitButton"
android:layout_width="wrap_content"
android:layout_height="wrap_content"
android:text="Submit"
android:layout_marginTop="16dp"/>
</LinearLayout>
ConstraintLayout
Modern flexible layout
<androidx.constraintlayout.widget.ConstraintLayout
xmlns:android="http://schemas.android.com/apk/res/android"
xmlns:app="http://schemas.android.com/apk/res-auto"
android:layout_width="match_parent"
android:layout_height="match_parent">
<TextView
android:id="@+id/title"
android:layout_width="wrap_content"
android:layout_height="wrap_content"
android:text="Title"
app:layout_constraintTop_toTopOf="parent"
app:layout_constraintStart_toStartOf="parent"
app:layout_constraintEnd_toEndOf="parent"/>
<Button
android:id="@+id/button"
android:layout_width="wrap_content"
android:layout_height="wrap_content"
android:text="Click"
app:layout_constraintTop_toBottomOf="@id/title"
app:layout_constraintStart_toStartOf="parent"
app:layout_constraintEnd_toEndOf="parent"
android:layout_marginTop="16dp"/>
</androidx.constraintlayout.widget.ConstraintLayout>
Activity Lifecycle Management
Understanding activity lifecycle prevents bugs Activities have complex lifecycle , system can destroy activities , must save state , and proper lifecycle handling prevents data loss
Lifecycle Callbacks
Override lifecycle methods
public class MainActivity extends AppCompatActivity {
@Override
protected void onCreate(Bundle savedInstanceState) {
super.onCreate(savedInstanceState);
// Initialize activity
setContentView(R.layout.activity_main);
}
@Override
protected void onStart() {
super.onStart();
// Activity becoming visible
}
@Override
protected void onResume() {
super.onResume();
// Activity in foreground, user can interact
}
@Override
protected void onPause() {
super.onPause();
// Activity losing focus, save critical data
}
@Override
protected void onStop() {
super.onStop();
// Activity no longer visible
}
@Override
protected void onDestroy() {
super.onDestroy();
// Activity being destroyed, cleanup resources
}
}
Save Instance State
Preserve data across configuration changes
@Override
protected void onSaveInstanceState(Bundle outState) {
super.onSaveInstanceState(outState);
outState.putString("user_input", editText.getText().toString());
outState.putInt("counter", counter);
}
@Override
protected void onCreate(Bundle savedInstanceState) {
super.onCreate(savedInstanceState);
setContentView(R.layout.activity_main);
if (savedInstanceState != null) {
String userInput = savedInstanceState.getString("user_input");
int counter = savedInstanceState.getInt("counter");
// Restore state
}
}
Threading and AsyncTask
Perform background work without blocking UI Android requires network and heavy operations off main thread , AsyncTask simplifies background tasks , but deprecated in API 30 , use coroutines or ExecutorService instead
AsyncTask Example (Deprecated)
Legacy background task approach
private class DownloadTask extends AsyncTask<String, Integer, String> {
@Override
protected void onPreExecute() {
// Runs on UI thread before background work
progressBar.setVisibility(View.VISIBLE);
}
@Override
protected String doInBackground(String... urls) {
// Runs on background thread
String result = downloadData(urls[0]);
publishProgress(50); // Update progress
return result;
}
@Override
protected void onProgressUpdate(Integer... progress) {
// Runs on UI thread
progressBar.setProgress(progress[0]);
}
@Override
protected void onPostExecute(String result) {
// Runs on UI thread after background work
textView.setText(result);
progressBar.setVisibility(View.GONE);
}
}
// Execute task
new DownloadTask().execute("https://api.example.com/data");
Modern Threading with ExecutorService
Recommended approach
ExecutorService executor = Executors.newSingleThreadExecutor();
Handler handler = new Handler(Looper.getMainLooper());
executor.execute(() -> {
// Background work
String result = performNetworkRequest();
handler.post(() -> {
// Update UI on main thread
textView.setText(result);
});
});
Coroutines in Kotlin
Modern asynchronous programming Coroutines simplify async code , sequential-looking code , structured concurrency , and built-in cancellation support
Basic Coroutine
Launch coroutine in scope
class MainActivity : AppCompatActivity() {
override fun onCreate(savedInstanceState: Bundle?) {
super.onCreate(savedInstanceState)
setContentView(R.layout.activity_main)
// Launch coroutine in lifecycle scope
lifecycleScope.launch {
val data = fetchDataFromNetwork() // Suspending function
textView.text = data
}
}
private suspend fun fetchDataFromNetwork(): String {
return withContext(Dispatchers.IO) {
// Network call on IO dispatcher
Thread.sleep(2000) // Simulate network delay
"Data from network"
}
}
}
Coroutine Dispatchers
Control execution context
lifecycleScope.launch {
// Main dispatcher - UI operations
progressBar.visibility = View.VISIBLE
val result = withContext(Dispatchers.IO) {
// IO dispatcher - network/disk operations
api.fetchData()
}
val processed = withContext(Dispatchers.Default) {
// Default dispatcher - CPU-intensive work
processData(result)
}
// Back on Main dispatcher
textView.text = processed
progressBar.visibility = View.GONE
}
Networking with Retrofit
Type-safe HTTP client for Android Retrofit simplifies REST API calls , converts JSON automatically , supports coroutines , and integrates with OkHttp
Setup Retrofit
Add dependencies and create interface
dependencies {
implementation 'com.squareup.retrofit2:retrofit:2.9.0'
implementation 'com.squareup.retrofit2:converter-gson:2.9.0'
}
// API interface
interface ApiService {
@GET("users/{id}")
suspend fun getUser(@Path("id") userId: String): User
@POST("users")
suspend fun createUser(@Body user: User): User
@GET("users")
suspend fun getUsers(@Query("page") page: Int): List<User>
}
// Data class
data class User(
val id: String,
val name: String,
val email: String
)
Create Retrofit Instance
Configure HTTP client
val retrofit = Retrofit.Builder()
.baseUrl("https://api.example.com/")
.addConverterFactory(GsonConverterFactory.create())
.build()
val apiService = retrofit.create(ApiService::class.java)
Make API Calls
Use coroutines for async requests
lifecycleScope.launch {
try {
val user = apiService.getUser("123")
nameTextView.text = user.name
emailTextView.text = user.email
} catch (e: Exception) {
Toast.makeText(this@MainActivity, "Error: ${e.message}",
Toast.LENGTH_SHORT).show()
}
}
Android Tools and Frameworks
Android Jetpack
Suite of libraries for modern Android development Jetpack provides recommended architecture , handles common tasks , reduces boilerplate , and follows best practices
Core Jetpack Components
Essential libraries
- Lifecycle: Lifecycle-aware components
- ViewModel: Manage UI data
- LiveData: Observable data holder
- Room: SQLite abstraction
- Navigation: In-app navigation
- WorkManager: Background tasks
- Paging: Load data in pages
- DataStore: Key-value storage
Room Database
Type-safe SQLite wrapper
// Entity
@Entity(tableName = "users")
data class User(
@PrimaryKey val id: String,
@ColumnInfo(name = "name") val name: String,
@ColumnInfo(name = "email") val email: String
)
// DAO
@Dao
interface UserDao {
@Query("SELECT * FROM users")
fun getAll(): LiveData<List<User>>
@Insert
suspend fun insert(user: User)
@Delete
suspend fun delete(user: User)
}
// Database
@Database(entities = [User::class], version = 1)
abstract class AppDatabase : RoomDatabase() {
abstract fun userDao(): UserDao
}
Material Design
Google's design system for Android Material Design provides consistent UI , pre-built components , theming system , and motion guidelines
Material Components
Use Material Design widgets
<com.google.android.material.button.MaterialButton
android:layout_width="wrap_content"
android:layout_height="wrap_content"
android:text="Material Button"
app:icon="@drawable/ic_add"/>
<com.google.android.material.textfield.TextInputLayout
android:layout_width="match_parent"
android:layout_height="wrap_content"
app:helperText="Enter your email">
<com.google.android.material.textfield.TextInputEditText
android:layout_width="match_parent"
android:layout_height="wrap_content"
android:hint="Email"/>
</com.google.android.material.textfield.TextInputLayout>
Firebase Integration
Google's mobile platform Firebase provides backend services , analytics , crash reporting , authentication , and cloud storage
Firebase Authentication
User authentication made easy
// Initialize Firebase Auth
val auth = FirebaseAuth.getInstance()
// Sign in with email/password
auth.signInWithEmailAndPassword(email, password)
.addOnCompleteListener { task ->
if (task.isSuccessful) {
val user = auth.currentUser
// User signed in
} else {
// Authentication failed
}
}
// Sign out
auth.signOut()
Dependency Injection with Dagger
Manage dependencies efficiently Dagger provides compile-time dependency injection , reduces boilerplate , improves testability , and enforces separation of concerns
Dagger Hilt Setup
Simplified Dagger for Android
// Application class
@HiltAndroidApp
class MyApplication : Application()
// Activity
@AndroidEntryPoint
class MainActivity : AppCompatActivity() {
@Inject lateinit var repository: UserRepository
override fun onCreate(savedInstanceState: Bundle?) {
super.onCreate(savedInstanceState)
// repository is injected automatically
}
}
// Module
@Module
@InstallIn(SingletonComponent::class)
object AppModule {
@Provides
@Singleton
fun provideUserRepository(): UserRepository {
return UserRepositoryImpl()
}
}
Testing Frameworks
Ensure code quality Android supports unit tests , instrumentation tests , UI tests , and integration tests
JUnit Unit Tests
Test business logic
class CalculatorTest {
@Test
fun addition_isCorrect() {
val calculator = Calculator()
assertEquals(4, calculator.add(2, 2))
}
}
Espresso UI Tests
Test user interface
@Test
fun buttonClick_updatesText() {
onView(withId(R.id.button)).perform(click())
onView(withId(R.id.textView))
.check(matches(withText("Clicked")))
}
Performance Profiling Tools
Optimize app performance Android Studio provides profilers for CPU , memory , network , and energy usage
CPU Profiler
Identify performance bottlenecks
Android Studio > View > Tool Windows > Profiler
- Record CPU activity
- Analyze method traces
- Find slow methods
Memory Profiler
Detect memory leaks
- Monitor memory allocation
- Capture heap dump
- Analyze object retention
- Find memory leaks
Android Forensics Basics
Logical Data Acquisition
Extract data without rooting device Logical acquisition uses ADB and backup mechanisms , doesn't require root access , preserves data integrity , and works on most devices
ADB Backup Method
Standard non-root data extraction
# Backup single app
adb backup -f app_backup.ab -noapk com.target.app
# Backup all user apps
adb backup -f full_backup.ab -all -noapk -nosystem
# Backup with shared storage
adb backup -f backup.ab -all -shared
# Extract backup file
java -jar abe.jar unpack app_backup.ab app_backup.tar
tar -xvf app_backup.tar
Content Provider Queries
Extract data through exposed providers
# Query contacts
adb shell content query --uri content://contacts/people
# Query SMS messages
adb shell content query --uri content://sms/inbox
# Query call log
adb shell content query --uri content://call_log/calls
# Dump to file
adb shell content query --uri content://contacts/people > contacts.txt
Package Manager Data
Extract app information
# List all packages
adb shell pm list packages -f > packages.txt
# Get app paths
adb shell pm path com.app.package
# Dump package info
adb shell dumpsys package com.app.package > package_info.txt
# Get app permissions
adb shell dumpsys package com.app.package | grep permission
Logcat Forensics
Capture runtime logs
# Capture all logs
adb logcat -d > logcat_dump.txt
# Filter by app
adb logcat | grep com.app.package > app_logs.txt
# Capture with timestamps
adb logcat -v time > timestamped_logs.txt
# Clear and monitor
adb logcat -c
adb logcat > live_logs.txt
Physical Data Acquisition
Full device imaging with root Physical acquisition requires root access , creates bit-by-bit copy , preserves deleted data , and enables deep forensics
Partition Imaging
Extract raw partitions
# List partitions
adb shell su -c "ls -l /dev/block/platform/*/by-name/"
# Dump userdata partition
adb shell su -c "dd if=/dev/block/mmcblk0p42 of=/sdcard/userdata.img"
adb pull /sdcard/userdata.img
# Dump system partition
adb shell su -c "dd if=/dev/block/mmcblk0p41 of=/sdcard/system.img"
adb pull /sdcard/system.img
# Calculate hash for integrity
md5sum userdata.img
sha256sum userdata.img
Full Device Imaging
Create complete device image
# Identify device block
adb shell su -c "ls -l /dev/block/mmcblk0"
# Create full image (WARNING: Large file)
adb shell su -c "dd if=/dev/block/mmcblk0 bs=4096 | gzip -c" > device_full.img.gz
# Or use netcat for faster transfer
# On computer:
nc -l -p 5555 > device_image.img
# On device:
adb shell su -c "dd if=/dev/block/mmcblk0 bs=4096 | nc 192.168.1.100 5555"
Memory Dump
Capture RAM contents
# Dump process memory
adb shell su -c "cat /proc/PID/maps"
adb shell su -c "dd if=/proc/PID/mem of=/sdcard/process_mem.dump"
# Dump kernel memory (requires special tools)
adb shell su -c "insmod lime.ko path=/sdcard/ram.lime format=lime"
adb pull /sdcard/ram.lime
SQLite Forensics
Analyze app databases for evidence SQLite stores most app data , contains user information , reveals app behavior , and often holds deleted records
Database Extraction
Pull databases from device
# List app databases
adb shell su -c "ls -la /data/data/com.app/databases/"
# Pull database
adb pull /data/data/com.app/databases/main.db
# Or use run-as for debuggable apps
adb shell run-as com.app.package
cp databases/main.db /sdcard/
exit
adb pull /sdcard/main.db
Database Analysis
Examine database contents
# Open database
sqlite3 main.db
# List tables
.tables
# Show table schema
.schema users
# Query data
SELECT * FROM users;
SELECT * FROM messages WHERE deleted=1;
# Export to CSV
.mode csv
.output users.csv
SELECT * FROM users;
.quit
Deleted Record Recovery
Find deleted but not overwritten data
# Dump database as hex
xxd main.db > main.hex
# Search for patterns
strings main.db | grep -i "password\|email\|token"
# Use forensic tools
sqlparse main.db --recover-deleted
# Check WAL file for recent changes
sqlite3 main.db-wal
.dump
Timeline Analysis
Reconstruct user activity
# Query with timestamps
SELECT datetime(timestamp, 'unixepoch') as time, * FROM events
ORDER BY timestamp DESC;
# Find activity in time range
SELECT * FROM messages
WHERE timestamp BETWEEN 1609459200 AND 1612137600;
# Aggregate by date
SELECT date(timestamp, 'unixepoch') as day, COUNT(*)
FROM events GROUP BY day;
File System Artifacts
Locate forensic evidence in file system Android stores artifacts in predictable locations , file metadata reveals activity , and deleted files may be recoverable
Common Artifact Locations
Key directories for forensics
# App data
/data/data/com.app.package/
# Shared preferences (often contains tokens)
/data/data/com.app.package/shared_prefs/
# Databases
/data/data/com.app.package/databases/
# Cache (temporary data)
/data/data/com.app.package/cache/
# External storage
/sdcard/Android/data/com.app.package/
# Download history
/data/data/com.android.providers.downloads/databases/downloads.db
# Browser history
/data/data/com.android.browser/databases/browser2.db
# SMS/MMS
/data/data/com.android.providers.telephony/databases/mmssms.db
# Contacts
/data/data/com.android.providers.contacts/databases/contacts2.db
File Metadata Analysis
Extract file information
# List with timestamps
adb shell su -c "ls -la --time-style=full-iso /data/data/com.app/"
# Find recently modified files
adb shell su -c "find /data/data/com.app/ -type f -mtime -7"
# Find files by size
adb shell su -c "find /data/data/com.app/ -type f -size +1M"
# Get file stats
adb shell su -c "stat /data/data/com.app/databases/main.db"
Thumbnail and Cache Analysis
Recover cached images
# Extract thumbnails
adb pull /sdcard/DCIM/.thumbnails/
# Browser cache
adb pull /data/data/com.android.browser/cache/
# App cache
adb pull /data/data/com.app/cache/
# Identify file types
file cached_image
Data Recovery Techniques
Recover deleted data from Android Deleted files may remain until overwritten , unallocated space contains remnants , and carving can extract files
Unallocated Space Analysis
Search for deleted data
# Dump unallocated space
adb shell su -c "dd if=/dev/block/mmcblk0p42 of=/sdcard/unallocated.img"
# Search for file signatures
strings unallocated.img | grep -i "password\|token"
# Use foremost for file carving
foremost -i unallocated.img -o recovered/
# Use photorec for recovery
photorec unallocated.img
SQLite Carving
Recover deleted database records
# Use sqlite-parser
sqlite-parser main.db --recover
# Manual hex analysis
xxd main.db | grep -A5 -B5 "username"
# Check freelist pages
sqlite3 main.db "PRAGMA freelist_count;"
Log File Analysis
Extract information from logs
# System logs
adb pull /data/system/dropbox/
# Kernel logs
adb shell su -c "dmesg > /sdcard/dmesg.txt"
adb pull /sdcard/dmesg.txt
# Last kmsg (from previous boot)
adb shell su -c "cat /proc/last_kmsg > /sdcard/last_kmsg.txt"
Testing Fundamentals
Unit Testing Basics
Test individual components in isolation Unit tests verify single functions , run fast , don't require device , and catch bugs early
JUnit Setup
Standard Java testing framework
dependencies {
testImplementation 'junit:junit:4.13.2'
testImplementation 'org.mockito:mockito-core:4.0.0'
}
Basic Unit Test
Test business logic
class CalculatorTest {
private lateinit var calculator: Calculator
@Before
fun setup() {
calculator = Calculator()
}
@Test
fun addition_isCorrect() {
val result = calculator.add(2, 3)
assertEquals(5, result)
}
@Test
fun division_byZero_throwsException() {
assertThrows(ArithmeticException::class.java) {
calculator.divide(10, 0)
}
}
@After
fun teardown() {
// Cleanup if needed
}
}
Mocking Dependencies
Test with fake dependencies
class UserRepositoryTest {
@Mock
private lateinit var api: ApiService
private lateinit var repository: UserRepository
@Before
fun setup() {
MockitoAnnotations.openMocks(this)
repository = UserRepository(api)
}
@Test
fun getUser_returnsUser() = runBlocking {
// Given
val expectedUser = User("1", "John")
`when`(api.getUser("1")).thenReturn(expectedUser)
// When
val result = repository.getUser("1")
// Then
assertEquals(expectedUser, result)
verify(api).getUser("1")
}
}
Integration Testing
Test component interactions Integration tests verify multiple components work together , require Android framework , and run on device/emulator
AndroidX Test Setup
Modern Android testing library
dependencies {
androidTestImplementation 'androidx.test:core:1.5.0'
androidTestImplementation 'androidx.test:runner:1.5.0'
androidTestImplementation 'androidx.test:rules:1.5.0'
androidTestImplementation 'androidx.test.ext:junit:1.1.5'
}
Database Integration Test
Test Room database
@RunWith(AndroidJUnit4::class)
class UserDaoTest {
private lateinit var database: AppDatabase
private lateinit var userDao: UserDao
@Before
fun createDb() {
val context = ApplicationProvider.getApplicationContext<Context>()
database = Room.inMemoryDatabaseBuilder(context, AppDatabase::class.java)
.build()
userDao = database.userDao()
}
@Test
fun insertAndRetrieveUser() = runBlocking {
val user = User("1", "John", "john@example.com")
userDao.insert(user)
val users = userDao.getAll().getOrAwaitValue()
assertTrue(users.contains(user))
}
@After
fun closeDb() {
database.close()
}
}
UI Testing with Espresso
Automated UI testing framework Espresso simulates user interactions , verifies UI state , runs on device , and catches UI bugs
Espresso Setup
Add dependencies
dependencies {
androidTestImplementation 'androidx.test.espresso:espresso-core:3.5.1'
androidTestImplementation 'androidx.test.espresso:espresso-intents:3.5.1'
}
Basic UI Test
Test user interactions
@RunWith(AndroidJUnit4::class)
class LoginActivityTest {
@get:Rule
val activityRule = ActivityScenarioRule(LoginActivity::class.java)
@Test
fun loginButton_click_startsMainActivity() {
// Type username
onView(withId(R.id.usernameEditText))
.perform(typeText("testuser"), closeSoftKeyboard())
// Type password
onView(withId(R.id.passwordEditText))
.perform(typeText("password123"), closeSoftKeyboard())
// Click login button
onView(withId(R.id.loginButton))
.perform(click())
// Verify MainActivity started
intended(hasComponent(MainActivity::class.java.name))
}
@Test
fun emptyUsername_showsError() {
onView(withId(R.id.loginButton)).perform(click())
onView(withId(R.id.usernameEditText))
.check(matches(hasErrorText("Username required")))
}
}
Test Automation
Automate test execution Automated tests run on every build , catch regressions , ensure quality , and save time
Gradle Test Tasks
Run tests from command line
# Run unit tests
./gradlew test
# Run instrumentation tests
./gradlew connectedAndroidTest
# Run specific test class
./gradlew test --tests CalculatorTest
# Run with coverage
./gradlew testDebugUnitTestCoverage
# Generate test report
./gradlew test
# Report at: build/reports/tests/testDebugUnitTest/index.html
Test Coverage
Measure code coverage
android {
buildTypes {
debug {
testCoverageEnabled true
}
}
}
# Generate coverage report
./gradlew createDebugCoverageReport
# View report
open build/reports/coverage/debug/index.html
Crash Reporting
Monitor app crashes in production Crash reports help identify bugs , provide stack traces , show device info , and enable quick fixes
Firebase Crashlytics
Popular crash reporting service
dependencies {
implementation 'com.google.firebase:firebase-crashlytics:18.6.0'
}
// Initialize in Application class
class MyApp : Application() {
override fun onCreate() {
super.onCreate()
FirebaseCrashlytics.getInstance().setCrashlyticsCollectionEnabled(true)
}
}
// Log custom events
FirebaseCrashlytics.getInstance().log("User clicked button")
// Set user identifier
FirebaseCrashlytics.getInstance().setUserId("user123")
// Force crash for testing
throw RuntimeException("Test crash")
Custom Exception Handling
Catch and report exceptions
Thread.setDefaultUncaughtExceptionHandler { thread, throwable ->
// Log to file
val logFile = File(filesDir, "crash.log")
logFile.appendText("${Date()}: ${throwable.stackTraceToString()}\n")
// Send to server
sendCrashReport(throwable)
// Call default handler
Thread.getDefaultUncaughtExceptionHandler()?.uncaughtException(thread, throwable)
}
Build Pipeline and CI/CD
Continuous Integration Setup
Automate build and test process CI runs tests on every commit , catches bugs early , ensures code quality , and speeds development
GitHub Actions for Android
Popular CI/CD platform
# .github/workflows/android.yml
name: Android CI
on:
push:
branches: [ main, develop ]
pull_request:
branches: [ main ]
jobs:
build:
runs-on: ubuntu-latest
steps:
- uses: actions/checkout@v3
- name: Set up JDK 11
uses: actions/setup-java@v3
with:
java-version: '11'
distribution: 'temurin'
- name: Grant execute permission for gradlew
run: chmod +x gradlew
- name: Build with Gradle
run: ./gradlew build
- name: Run unit tests
run: ./gradlew test
- name: Upload test reports
uses: actions/upload-artifact@v3
if: always()
with:
name: test-reports
path: app/build/reports/
GitLab CI for Android
Self-hosted CI option
# .gitlab-ci.yml
image: openjdk:11-jdk
variables:
ANDROID_COMPILE_SDK: "33"
ANDROID_BUILD_TOOLS: "33.0.0"
before_script:
- apt-get --quiet update --yes
- apt-get --quiet install --yes wget unzip
- wget --quiet --output-document=android-sdk.zip https://dl.google.com/android/repository/commandlinetools-linux-latest.zip
- unzip -q android-sdk.zip -d android-sdk
- export ANDROID_HOME=$PWD/android-sdk
- export PATH=$PATH:$ANDROID_HOME/cmdline-tools/latest/bin
- sdkmanager --licenses
- sdkmanager "platforms;android-${ANDROID_COMPILE_SDK}" "build-tools;${ANDROID_BUILD_TOOLS}"
stages:
- build
- test
build:
stage: build
script:
- ./gradlew assembleDebug
artifacts:
paths:
- app/build/outputs/
test:
stage: test
script:
- ./gradlew test
Automated Testing Pipeline
Run tests automatically Automated pipeline runs unit tests , instrumentation tests , static analysis , and generates reports
Complete Test Pipeline
Multi-stage testing
# GitHub Actions example
jobs:
test:
runs-on: ubuntu-latest
steps:
- uses: actions/checkout@v3
- name: Unit Tests
run: ./gradlew test
- name: Lint Check
run: ./gradlew lint
- name: Static Analysis
run: ./gradlew detekt
- name: Security Scan
run: ./gradlew dependencyCheckAnalyze
- name: Upload Reports
uses: actions/upload-artifact@v3
with:
name: reports
path: |
app/build/reports/
app/build/test-results/
Code Signing Certificates
Secure app signing for distribution Signing proves app authenticity , prevents tampering , required for distribution , and establishes developer identity
Generate Keystore
Create signing key
# Generate new keystore
keytool -genkey -v -keystore my-release-key.jks \
-keyalg RSA -keysize 2048 -validity 10000 \
-alias my-key-alias
# Verify keystore
keytool -list -v -keystore my-release-key.jks
# Export certificate
keytool -export -rfc -keystore my-release-key.jks \
-alias my-key-alias -file my-cert.pem
Configure Signing in Gradle
Automate signing process
android {
signingConfigs {
release {
storeFile file("my-release-key.jks")
storePassword System.getenv("KEYSTORE_PASSWORD")
keyAlias "my-key-alias"
keyPassword System.getenv("KEY_PASSWORD")
}
}
buildTypes {
release {
signingConfig signingConfigs.release
minifyEnabled true
proguardFiles getDefaultProguardFile('proguard-android.txt'), 'proguard-rules.pro'
}
}
}
Secure Key Management
Protect signing keys
# Store in environment variables
export KEYSTORE_PASSWORD="your_password"
export KEY_PASSWORD="your_key_password"
# Or use keystore.properties (add to .gitignore)
echo "storePassword=your_password" > keystore.properties
echo "keyPassword=your_key_password" >> keystore.properties
echo "keyAlias=my-key-alias" >> keystore.properties
echo "storeFile=my-release-key.jks" >> keystore.properties
// Load from properties file
def keystorePropertiesFile = rootProject.file("keystore.properties")
def keystoreProperties = new Properties()
keystoreProperties.load(new FileInputStream(keystorePropertiesFile))
android {
signingConfigs {
release {
storeFile file(keystoreProperties['storeFile'])
storePassword keystoreProperties['storePassword']
keyAlias keystoreProperties['keyAlias']
keyPassword keystoreProperties['keyPassword']
}
}
}
Build Automation
Automate entire build process Build automation compiles code , runs tests , signs APK , and prepares release
Automated Release Build
Complete build script
#!/bin/bash
# build-release.sh
set -e # Exit on error
echo "Starting release build..."
# Clean previous builds
./gradlew clean
# Run tests
echo "Running tests..."
./gradlew test
# Run lint
echo "Running lint..."
./gradlew lint
# Build release APK
echo "Building release APK..."
./gradlew assembleRelease
# Sign APK
echo "Signing APK..."
# Already signed if configured in Gradle
# Verify signature
echo "Verifying signature..."
jarsigner -verify -verbose -certs app/build/outputs/apk/release/app-release.apk
# Generate checksum
echo "Generating checksum..."
sha256sum app/build/outputs/apk/release/app-release.apk > app-release.sha256
echo "Build complete!"
echo "APK: app/build/outputs/apk/release/app-release.apk"
Versioning Automation
Auto-increment version
def getVersionCode() {
def versionPropsFile = file('version.properties')
if (versionPropsFile.canRead()) {
def Properties versionProps = new Properties()
versionProps.load(new FileInputStream(versionPropsFile))
def code = versionProps['VERSION_CODE'].toInteger() + 1
versionProps['VERSION_CODE'] = code.toString()
versionProps.store(versionPropsFile.newWriter(), null)
return code
} else {
throw new GradleException("Could not read version.properties!")
}
}
android {
defaultConfig {
versionCode getVersionCode()
versionName "1.0.${versionCode}"
}
}
Preparing for Android Penetration Testing
Critical Knowledge Checklist
Before diving into Android penetration testing you need solid foundation This section summarizes essential knowledge from this guide , highlights what matters most for security testing , and identifies gaps you should fill
Must-Know Architecture Concepts
Understanding how Android works is non-negotiable Linux kernel provides process isolation through UIDs , each app runs in separate process with unique UID , Binder IPC enables inter-process communication , SELinux enforces mandatory access control , and Zygote spawns app processes
Why this matters for pentesting: You need to understand isolation boundaries to know what's possible , recognize when apps break isolation rules , understand how to escalate privileges , and identify architectural vulnerabilities
Must-Know Security Model
Android's security relies on multiple layers Application sandboxing isolates apps , permission system controls resource access , verified boot ensures system integrity , TrustZone provides hardware-backed security , and SafetyNet detects compromised devices
Why this matters for pentesting: You'll test permission bypasses , attempt sandbox escapes , analyze root detection mechanisms , bypass SafetyNet checks , and understand what security guarantees exist
Must-Know File System
Data storage is where secrets hide Apps store data in /data/data/package/ , SQLite databases contain sensitive information , SharedPreferences often leak credentials , external storage is world-readable , and scoped storage changed access model in Android 10+
Why this matters for pentesting: Most vulnerabilities involve insecure data storage , you'll extract databases for analysis , find hardcoded credentials in preferences , identify world-readable files , and test backup mechanisms
Must-Know APK Structure
APKs are just ZIP files with specific structure AndroidManifest.xml declares components and permissions , DEX files contain compiled code , resources include layouts and strings , native libraries provide platform-specific code , and META-INF contains signing information
Why this matters for pentesting: Static analysis starts with APK structure , you'll decompile DEX to Java/Smali , analyze manifest for attack surface , extract hardcoded secrets from resources , and verify code signing
Must-Know Components
Android apps built from four component types Activities provide UI screens , Services run background tasks , BroadcastReceivers respond to system events , ContentProviders share data between apps , and Intents enable component communication
Why this matters for pentesting: Exported components are attack surface , you'll test intent injection , exploit insecure ContentProviders , abuse broadcast receivers , and chain components for privilege escalation
Must-Know Permissions
Permission system controls app capabilities Normal permissions granted automatically , dangerous permissions require user approval , signature permissions for same-developer apps , and runtime permission model since Android 6.0
Why this matters for pentesting: You'll identify permission over-granting , test permission bypasses , exploit custom permissions , analyze permission delegation , and understand what data apps can access
Must-Know ADB
Android Debug Bridge is your primary tool Install and manage apps , access device shell , pull and push files , view logs with logcat , dump system state , and enable network debugging
Why this matters for pentesting: ADB is essential for every test , you'll use it constantly for app installation , log monitoring , file extraction , process inspection , and device control
Must-Know Build Process
Understanding how apps are built helps break them Gradle builds APKs , ProGuard/R8 obfuscate code , signing proves authenticity , build variants create different versions , and AAB format replaced APK for Play Store
Why this matters for pentesting: You'll reverse obfuscated code , understand build configurations , identify debug vs release builds , analyze signing certificates , and extract apps from AAB format
Must-Know Network Security
Most apps communicate over network Network Security Configuration controls TLS , certificate pinning prevents MITM , cleartext traffic often disabled , TLS 1.2+ required , and proxy detection common in security-conscious apps
Why this matters for pentesting: You'll intercept HTTPS traffic , bypass certificate pinning , analyze API communication , test for cleartext transmission , and identify network vulnerabilities
Must-Know Cryptography
Apps use crypto for data protection Android Keystore provides hardware-backed keys , AES for symmetric encryption , RSA for asymmetric encryption , SHA-256 for hashing , and SecureRandom for random generation
Why this matters for pentesting: You'll identify weak crypto , find hardcoded keys , test key storage security , analyze encryption implementations , and exploit cryptographic vulnerabilities
Essential Tools Mastery
Tools you must know before pentesting
ADB (Android Debug Bridge)
# Core commands you'll use daily
adb devices # List connected devices
adb install app.apk # Install app
adb shell # Access device shell
adb logcat # View logs
adb pull /path/file # Extract files
adb shell pm list packages # List installed apps
adb shell dumpsys package pkg # Get app info
APK Analysis Tools
# Decompilation and analysis
apktool d app.apk # Decompile APK
jadx app.apk # Decompile to Java
dex2jar app.apk # Convert DEX to JAR
jd-gui app.jar # View Java code
Frida (Runtime Instrumentation)
# Hook into running apps
frida -U -f com.app.package # Spawn and attach
frida -U com.app.package # Attach to running
frida-ps -U # List processes
Objection (Frida wrapper)
# Simplified Frida usage
objection -g com.app explore # Start exploration
android sslpinning disable # Bypass SSL pinning
android root disable # Bypass root detection
Common Pentest Scenarios
Real-world testing situations you'll encounter
Scenario 1: Insecure Data Storage
App stores sensitive data insecurely
# Extract app data
adb backup -f backup.ab com.app.package
java -jar abe.jar unpack backup.ab backup.tar
tar -xvf backup.tar
# Analyze databases
sqlite3 apps/com.app/db/database.db
.tables
SELECT * FROM users;
# Check SharedPreferences
cat apps/com.app/sp/prefs.xml | grep -i "password\|token\|key"
Scenario 2: Exported Component Exploitation
App exposes components without proper protection
# Find exported components
adb shell dumpsys package com.app | grep -A5 "Activity\|Service\|Receiver\|Provider"
# Test exported Activity
adb shell am start -n com.app/.VulnerableActivity
# Test exported Service
adb shell am startservice -n com.app/.VulnerableService
# Test BroadcastReceiver
adb shell am broadcast -a com.app.CUSTOM_ACTION
Scenario 3: Network Traffic Interception
App communicates over network
# Setup proxy
adb shell settings put global http_proxy 192.168.1.100:8080
# Install CA certificate
adb push burp-ca.crt /sdcard/
# Settings > Security > Install from storage
# Bypass SSL pinning with Frida
frida -U -f com.app -l ssl-bypass.js
Scenario 4: Root Detection Bypass
App detects rooted device
// Frida script to bypass root detection
Java.perform(function() {
var RootCheck = Java.use("com.app.RootDetection");
RootCheck.isRooted.implementation = function() {
console.log("Root check bypassed");
return false;
};
});
Knowledge Gaps to Address
Areas not fully covered in this basics guide
Advanced Topics for Further Study
Native code analysis (ARM assembly , JNI , NDK) Advanced Frida scripting and hooking techniques Custom ROM and kernel modifications Android malware analysis and reverse engineering Exploit development for Android vulnerabilities Advanced obfuscation and anti-analysis techniques
Recommended Next Steps
- Practice on vulnerable apps (DVIA , InsecureBankv2 , OVAA)
- Read OWASP Mobile Security Testing Guide
- Study real CVEs and security advisories
- Join bug bounty programs for hands-on experience
- Contribute to open-source Android security tools
Quick Reference Commands
Commands you'll use constantly during pentests
App Information
adb shell pm list packages | grep keyword
adb shell pm path com.app.package
adb shell dumpsys package com.app.package | grep version
adb shell ps | grep com.app.package
File Operations
adb pull /data/app/com.app.package/base.apk
adb pull /data/data/com.app.package/databases/
adb pull /data/data/com.app.package/shared_prefs/
adb shell run-as com.app.package ls /data/data/com.app.package
Log Analysis
adb logcat | grep com.app.package
adb logcat -s TAG:V
adb logcat *:E # Errors only
adb logcat -c # Clear logs
Process Inspection
adb shell ps -A | grep com.app
adb shell cat /proc/PID/maps
adb shell cat /proc/PID/status
Network Testing
adb shell netstat -an | grep ESTABLISHED
adb shell tcpdump -i any -w /sdcard/capture.pcap
adb pull /sdcard/capture.pcap
Final Preparation Checklist
Before starting Android penetration testing verify you can:
- Decompile APK and read Java/Smali code
- Analyze AndroidManifest.xml for attack surface
- Extract and analyze app databases
- Use ADB for app installation and file operations
- Monitor logcat for sensitive information
- Intercept HTTPS traffic with Burp Suite
- Bypass SSL pinning with Frida
- Test exported components with ADB
- Identify insecure data storage
- Understand permission model and test bypasses
- Root device and install Magisk
- Use Frida for runtime instrumentation
- Analyze network traffic with Wireshark
- Understand Android security architecture
- Read and understand Java/Kotlin code
If you can do all of the above you're ready for Android Penetration Testing
If not review the relevant sections in this guide and practice on vulnerable apps until comfortable
Summary
This comprehensive Android basics guide covers 145+ topics organized into major sections:
Foundation Knowledge - Introduction to Android (6 topics) - Core Architecture (10 topics) - Security Model (9 topics)
Data and Storage - File System and Storage (11 topics) - APK Structure (8 topics)
Application Development - Application Components (12 topics) - Permission System (7 topics) - Android Debug Bridge (10 topics) - Build and Development (6 topics)
Security Implementation - Network Security (6 topics) - Cryptography (6 topics)
Development Environment - Setting Up Development Environment (7 topics) - Android Programming Fundamentals (7 topics) - Android Tools and Frameworks (6 topics)
Pentest Prerequisites - Android Forensics Basics (5 topics) - Testing Fundamentals (5 topics) - Build Pipeline and CI/CD (4 topics)
Every topic includes: - Deep technical explanations - Executable commands and code examples - Security best practices and common vulnerabilities - Real-world scenarios and practical applications - ADB commands for hands-on testing
This guide provides the solid foundation needed before diving into Android Penetration Testing modules covering static analysis , dynamic analysis , network testing , instrumentation , component testing , and storage testing
Remember: Understanding these basics isn't optional for effective Android security testing , it's the difference between finding surface-level issues and discovering critical vulnerabilities that others miss